在新西兰
DYNAVIN N6 Dynavin has made some BIG changes to their Audio/Video/Navigation System offerings, enough to warrant a new thread, and to hopefully keep all the relevant info and discussions in one place for future users of this forum. Please lets try to keep this thread about Dynavin and try to keep it informative, Q & A stuff....try to leave opinions and speculation out of it, there are already 100 other pages of that. Thank you in advance.
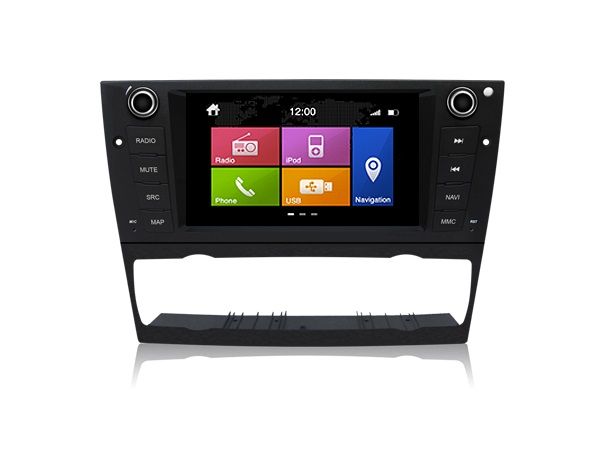
The new N6 unit is 2 years in the making, with a big emphasis on higher quality audio components, features, and improved ease of use. You audiophiles will appreciate features like 24bit burr brown D/A converters, 5 band EQ, time alignment, 4 volt preamp outputs (for those of you with aftermarket amps), basically higher end internals across the board... The result is cleaner sound, much more consistent performance, a much better user interface, and a better appearance. And YES IT WORKS WITH THE LOGIC 7 AUDIO SYSTEM.....when ordered with the MOST fiber optic adapter. ....and the best part? The price went DOWN....  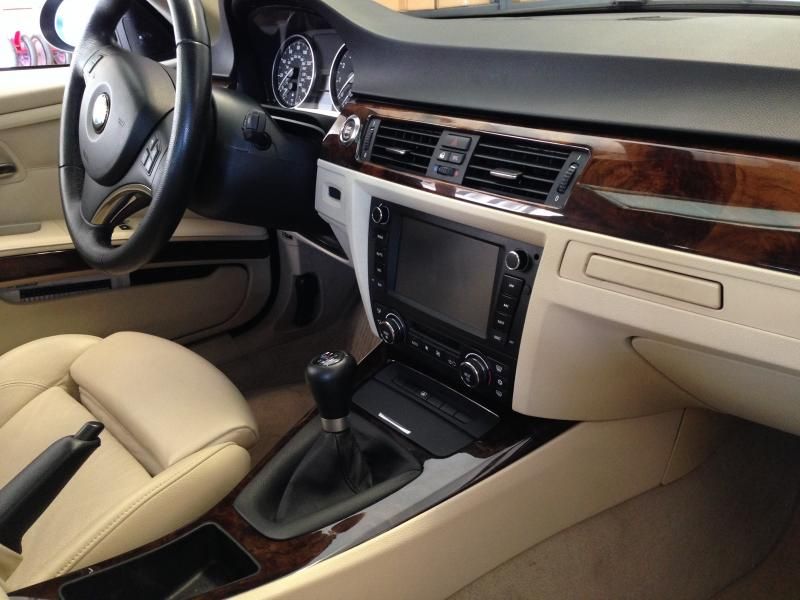 As always, they are available in a variety of shapes and sizes to fit the BMW E46, E39, E53, E90,, and an assortment of Audi, VW, Porsche and Mercedes models. INSTALL I thought I would give you guys an idea of what the install is like....pretty straightforward. I didnt cover EVERYTHING here as there will be some variation between installs depending on what you are starting with and where you are going....but what I cover here is pretty universal to all installs and should give you a rough idea of what you are getting into.Here is the starting point, its a good idea to lay down a towel over your center console to avoid any accidental scratches while you are working. 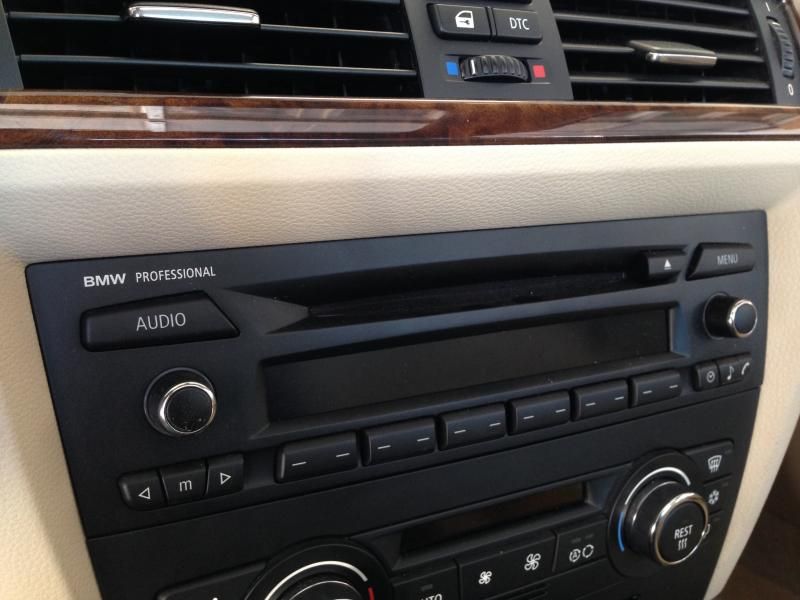 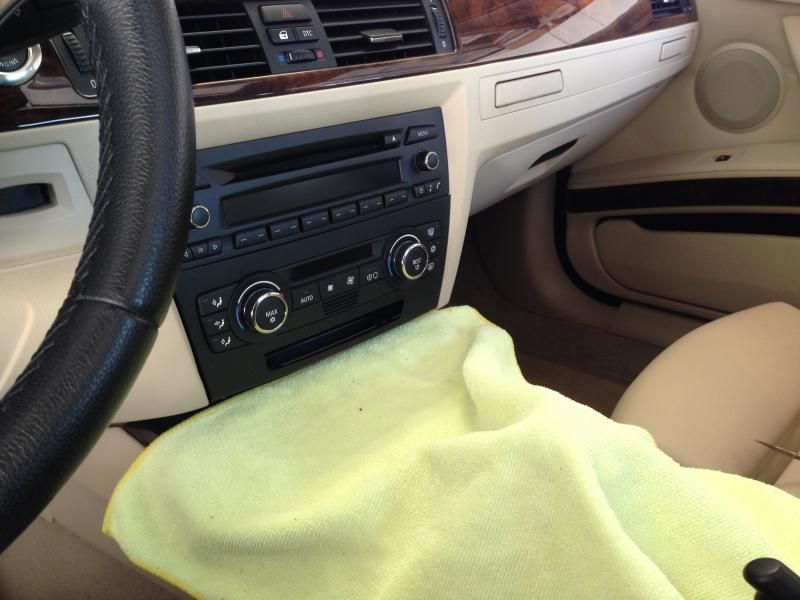 Carefully use a screwdriver or trim removal tool to pop out the trim around the HVAC controls, be careful and use a towel if needed so you dont mar any of the plastic.  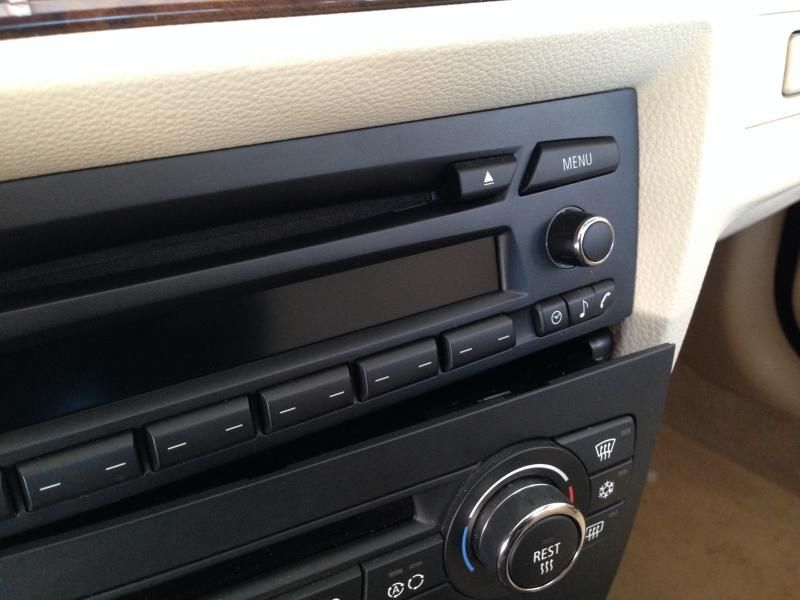 Unplug the HVAC controls, these plugs use a little rotating lever to push the plug out of the controls, If your car has the second row of buttons below the HVAC unclip and unplug these as well:  Unclip the HVAC controls from its surrounding trim piece. 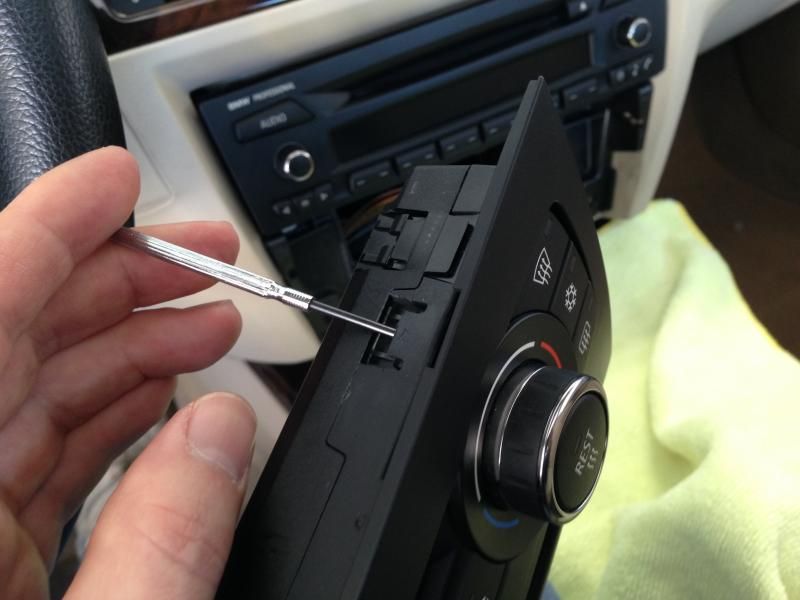 Take out the two screws under the stereo, pull it out and unplug it. 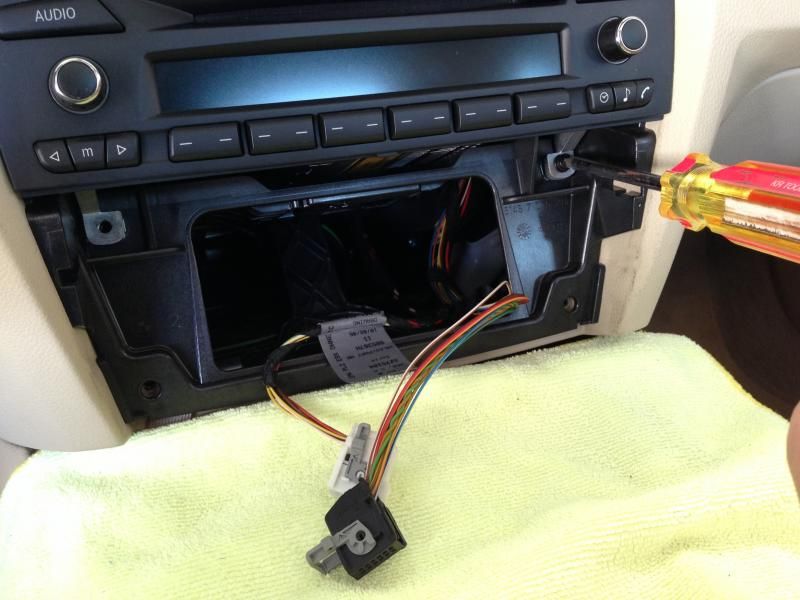  Take out the screws holding the radio bracket in the dash and pull the bracket out. 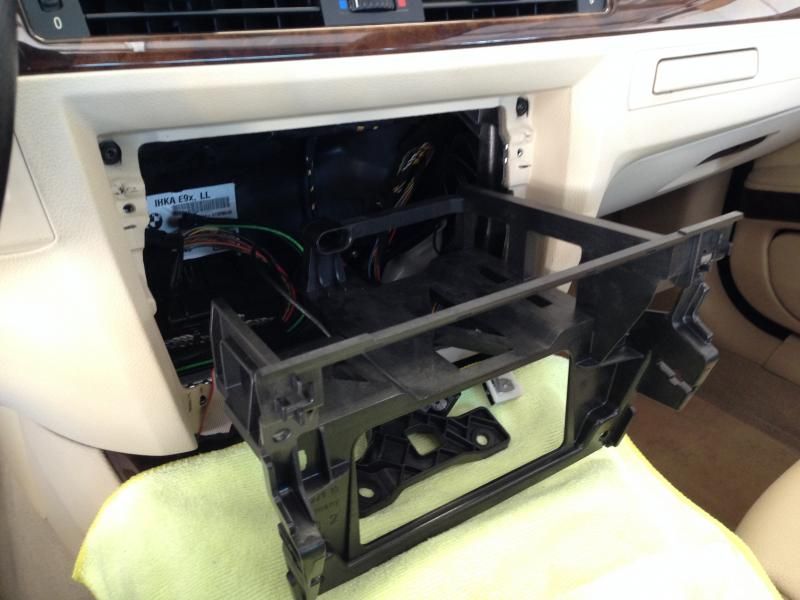 Now you have a big hole in your dash, at this point you want to route your ipod/USB/aux cables or whatever else you might be running in your particular install to wherever they need to go. Glove compartment is the obvious place but you can do console, storage cubbys, ashtray, whatever... You will also need to install the GPS antenna and bluetooth mic. If your car has the second row of buttons this is also the time when you would do the relocation of those to the console ashtray area using either the dynavin replacement ashtray assembly OR the metra storage tray kit. Not pictured here but basically you pull up the top console trim, take out the ashtray and replace it with the button relocation solution of your choice. Take the HVAC controls and file off the corner of the tabs that stick out, this is not a critical part of the unit and allows the HVAC controls to fit correctly in the new trim piece as part of the dynavin. Holding the HVAC controls in position next to the dynavin should make it clear what needs to be shaved. 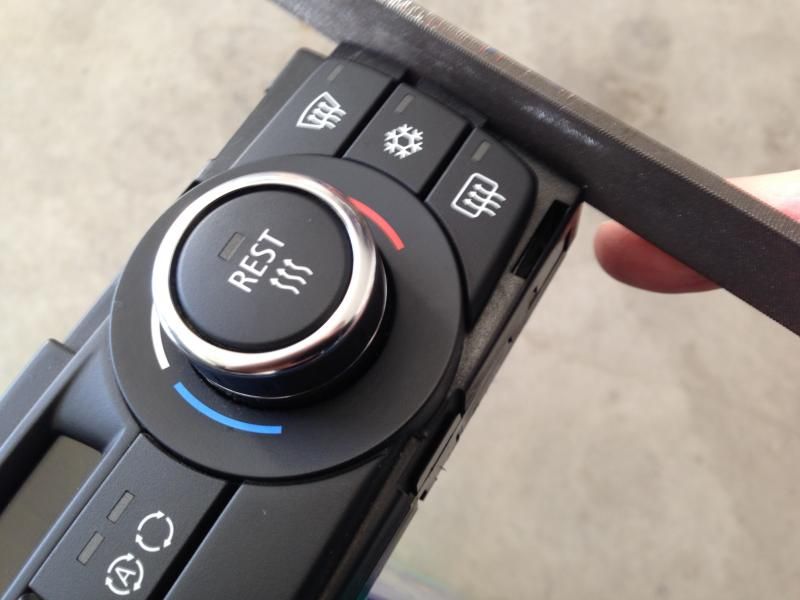 Snap the controls into the dynavin. Install the metal bottom clips onto the dynavin if they are not already in place. 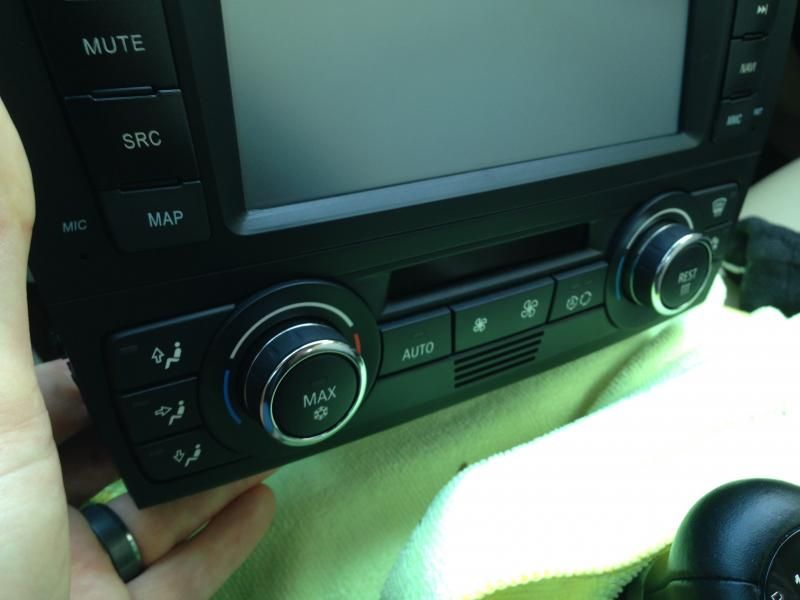 Here is a picture of the main wiring harness and its connections on the E9X model, in this pic you can see the MOST interface at the bottom, it plugs in into the wire harness, the RCA outputs from the head unit, and once in the car, into the MOST fiber optic cable. At the top of the pic you see the canbus interface box, it just plugs into the dynavins main harness, done. To the right you see the main plug that plugs into the oem radio plug. And next to it you see the yellow constant power wire. 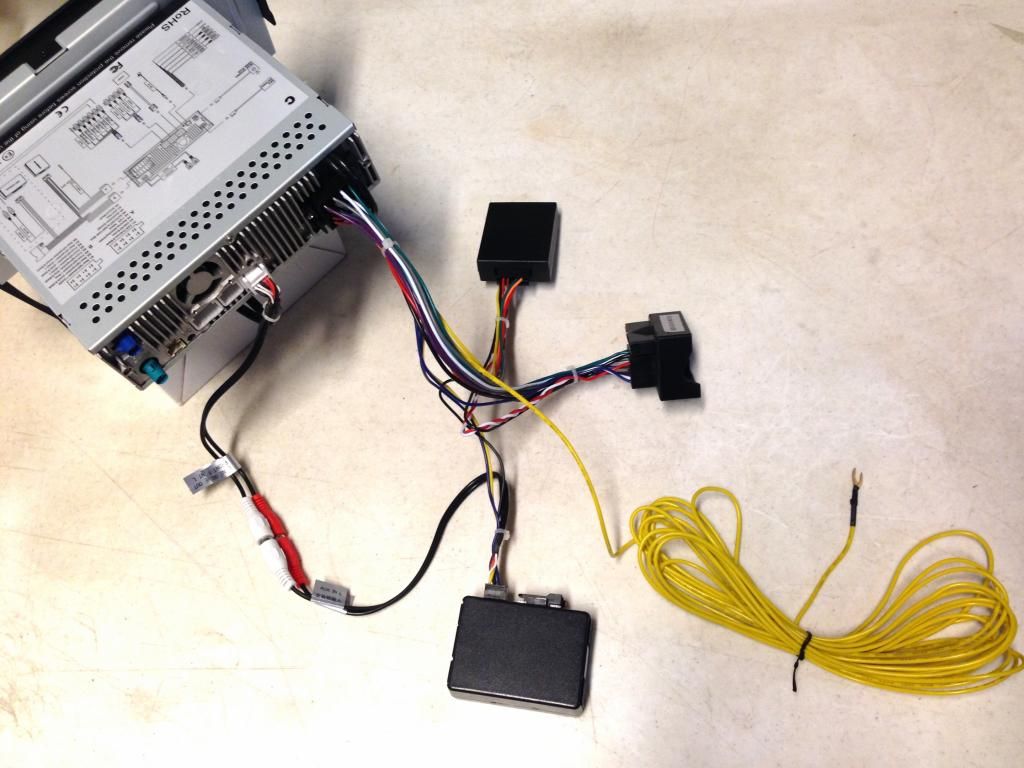 Dynavin has the harness set up with enough wire to reach the battery and the brief instructions that come with the unit say to connect to the battery.....of course any constant power circuit available in the fuse compartment will do the trick BUT finding that circuit in an E90 can be a challenge! There are multiple fuse compartment configurations so what works for one person may not work for another. AND the E90 is tricky as it "goes to sleep" after 20 minutes so most of the circuits that look like constant power actually are not. This will result in the unit loosing some of its memory after 20-30 minutes. Finding a constant power source takes some trial and error.....I personally looked at the fuse chart....used my brain....a little bit of previous experience, and got a good constant power source on the second try. But keep this in mind....by the time you "trial and error" a few cycles of the car going to sleep, you could have easily run the power wire to the batter in half the time. So its up to you how you do it, but so long as its constant power you are good to go. More on this here:http://www.e90post.com/forums/showthread.php?t=809672 Because I know you guys are going to ask anyway..  ...despite what I said above....here is a pic of the location that worked in MY CAR (2007 335). Taking a look at my fuse chart it corresponds to position 70, an engine related fuse location....although my fuse box has nothing in that slot. Same as I talk about below though, depending on how you connect in the fuse box you may need to add an inline fuse to protect the power wire in the case of a short. (see below) ...despite what I said above....here is a pic of the location that worked in MY CAR (2007 335). Taking a look at my fuse chart it corresponds to position 70, an engine related fuse location....although my fuse box has nothing in that slot. Same as I talk about below though, depending on how you connect in the fuse box you may need to add an inline fuse to protect the power wire in the case of a short. (see below)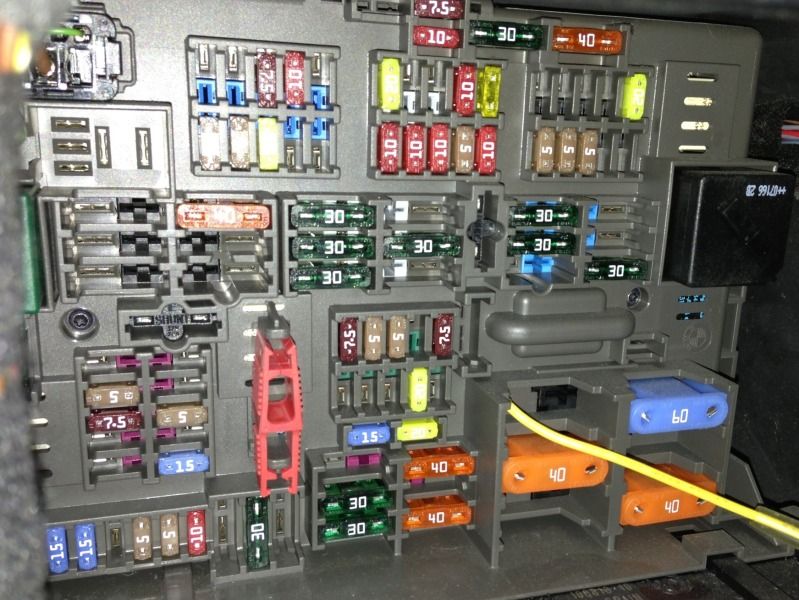 An important point about wiring for you DIYers out there..... IF you end up running the constant power wire back to the battery you MUST install a fuse at the battery end of the wire. Installers know this, we fuse EVERYTHING right at the battery, in the case of a short circuit all that happens is you pop a fuse, without the fuse in place you could have a fire on your hands. I realized the wire harness does not have one already and if you dont work in car audio or electronics you may not realize you have to put a fuse on everything. So before you install, stop by your local auto parts store and grab an inline fuse holder, some 10 or 15 amp fuses, and some butt splices (or solder or whatever you have on hand, NO twist & TAPE!!!!). we need to install one of these..... 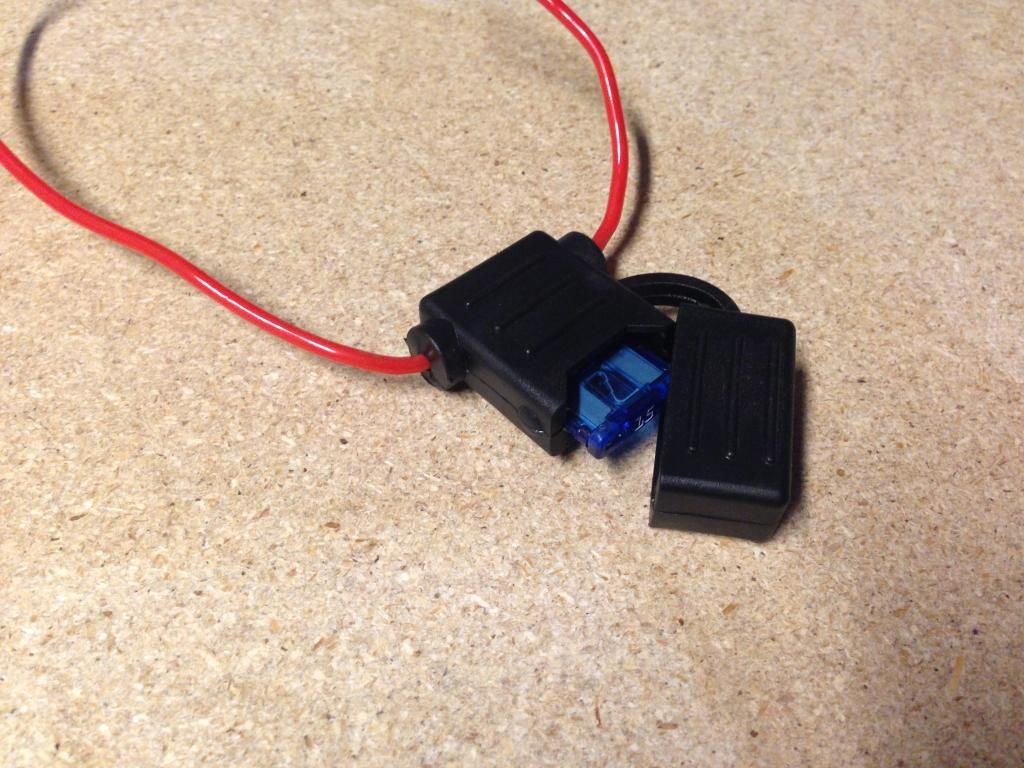 Like this: 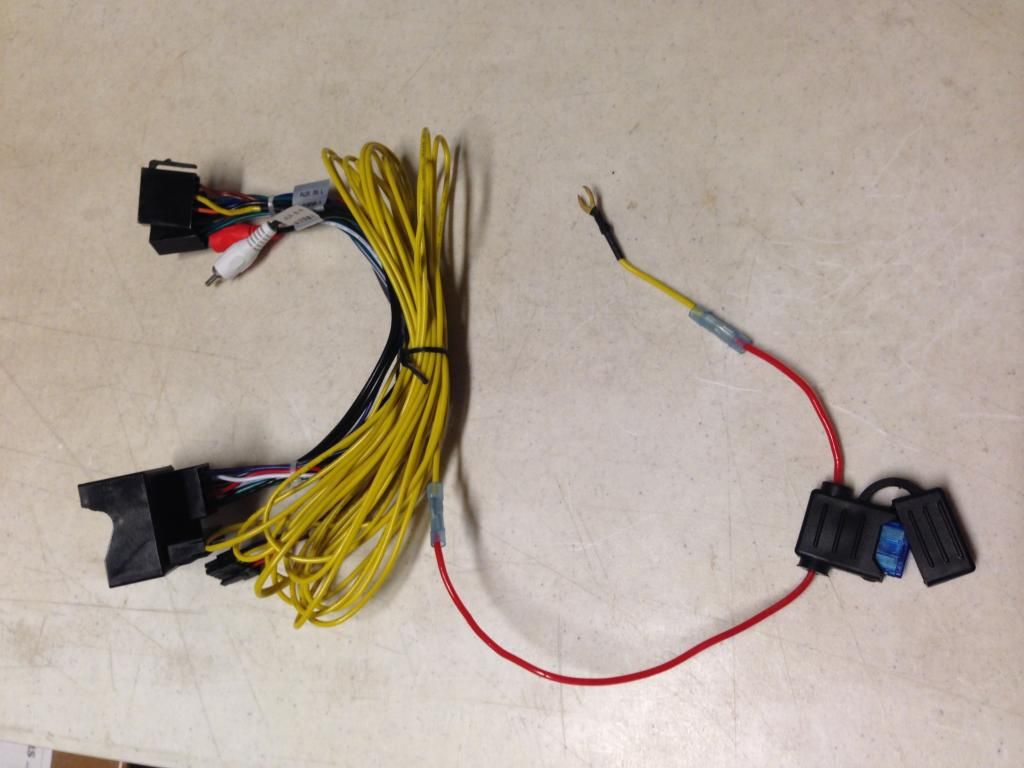 Now its safe to connect to the battery. If you connect at the fuse box you can use a "fuse tap" (get this from your local auto parts store as well), be sure to install it in the correct way so that the circuit is safely fused, this will vary depending on the style of fuse tap you use. I have talked to dynavin about adding a fuse to the harness in the future production to save you guys the trouble....but for now make sure you take the safe route and install a fuse. In my personal car I snaked the GPS antenna lead up to the center dash location (where the center channel speaker is on a L7 equipped car), with the older dynavin units I had the gps antenna on TOP of the dash in this location as putting it under the dash reduced the signal strength, So far with the N6 it seems to be running fine with the GPS antenna stuck on the metal crossbar inside the dash, under the vent/speaker assembly. Since I DO have a center channel speaker I have the antenna pushed off to the passenger side so its not under the speaker. For the mic, for best results you may want to play around with the location a bit, in my car I ran it up the pillar and to the oem location next to the sunroof controls, I like this location for cosmetic reasons BUT its noisy as the mic is up in a cavity in the roof, only inches away from the roof panel and sunroof, so there is wind noise. To combat this I looked around my garage and came up with a "macgyver" fix for it.... I had some 3/4" adhesive backed weatherstripping foam laying around so I cut some of that up and put it over the back side of the mic, insulating it from the noise from the roof of the car. You could use any number of things for this, I would think some of the thicker dynamats would work nicely as well.....even carve out an old egg crate mattress piece....basically any kind of sound insulating foam cut to the right shape and stuffed in there behind the mic would work. Just make sure the business end of the mic is facing the grill and the cabin. UPDATE: Because I know you guys are going to ask.... I spent a good chunk of time finding the optimum placement for the external Bluetooth mic. I set myself up a little science experiment with a couple phones, some headphones, and some highway miles. After trying every conceivable configuration I discovered a few things..... The mic is VERY directional.....point it directly at you and your voice will loud and clear, point it sideways and you will sound distant, point it away from you and you will barely be heard. The mic appears to use some passive noise canceling and works MUCH better if the holes on the back of the mic are uncovered. I've been using my mic for years mounted in the stock location next to the sunroof controls, it worked ok but I thought it could probably be better. After experimenting and finding the noise canceling properties inherent in the mic design I now think its a good idea to have the mic exposed. I realize some of you guys won't like this location as you can see the mic, fair enough, but it really does work much better out in the open....  I used a twist tie(that was tying up the mic cord) wrapped around the mic to hold it in place, I loosened the boot where the wiring runs to the mirror and pulled the wire tie through the gap, pushed the boot back into place and the mic was secure. The wire for the mic just comes out of the front of the headliner. From the drivers seat you can barely see it, and even if you do look at it, it doesnt look like anything, it kind of looks like part of the mirror mount. 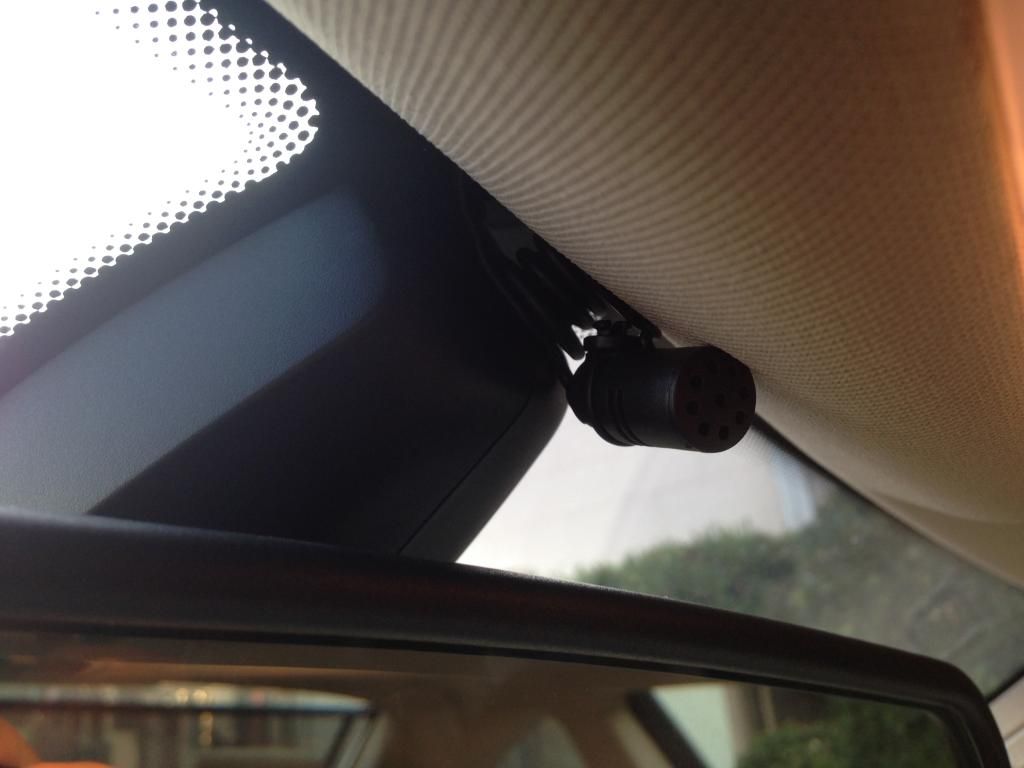 Plug in the dynavins main wire harness and plug the canbus box into the harness as well. 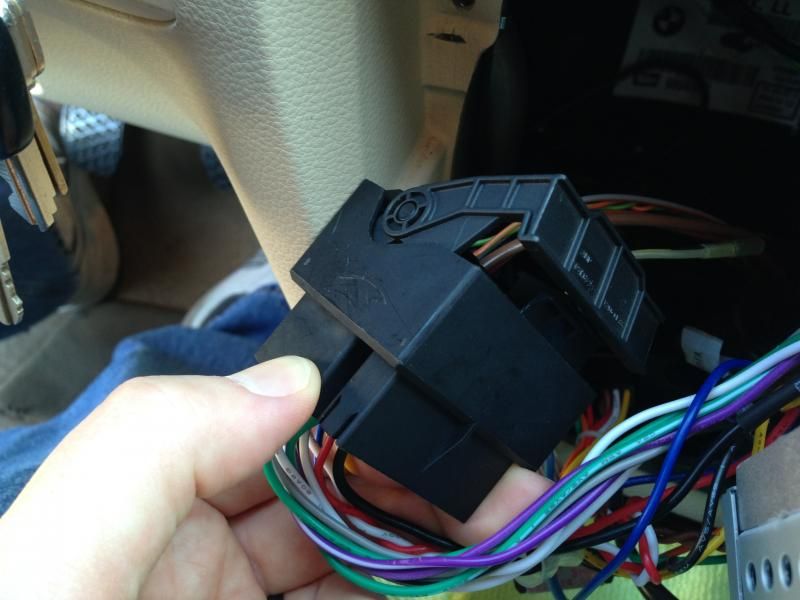 IF YOUR CAR HAS THE L7 AUDIO SYSTEM WITH THE FIBER OPTIC CABLES you will need to unclip the fiber optic cables from the stock stereo plug and plug them into the MOST cable end adapter.....and that into the interface box. Plug the box into the dynavin's wire harness, and plug the RCA cables coming from the MOST box plug into the FRONT RCA OUTPUTS from the dynavin.  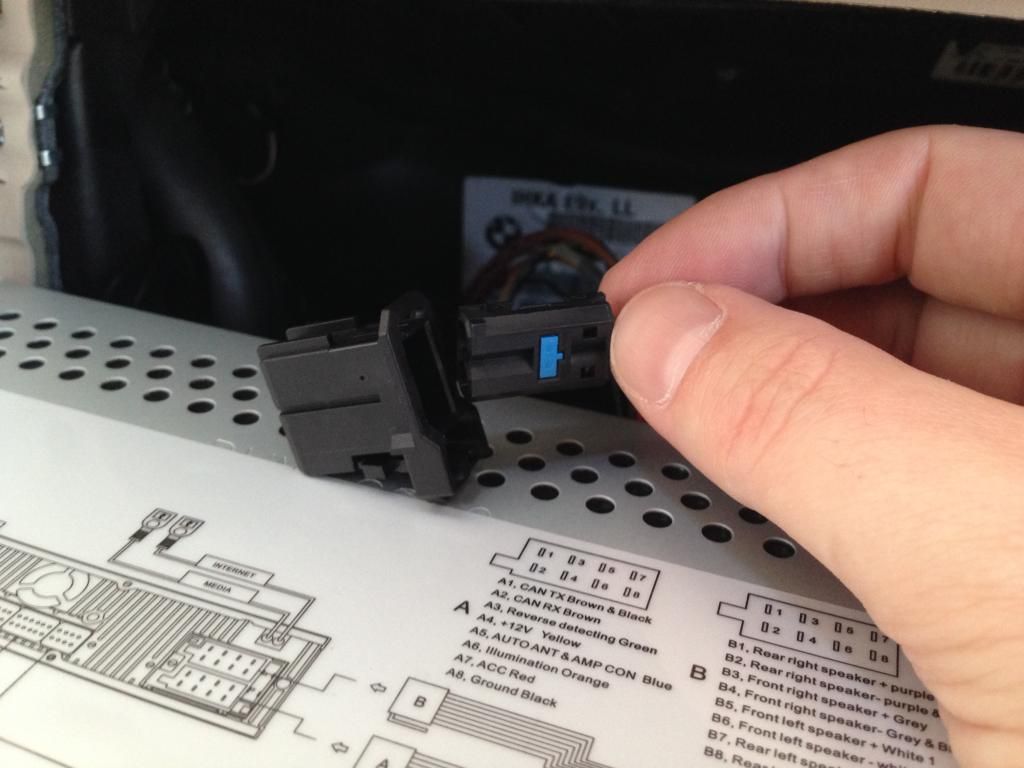 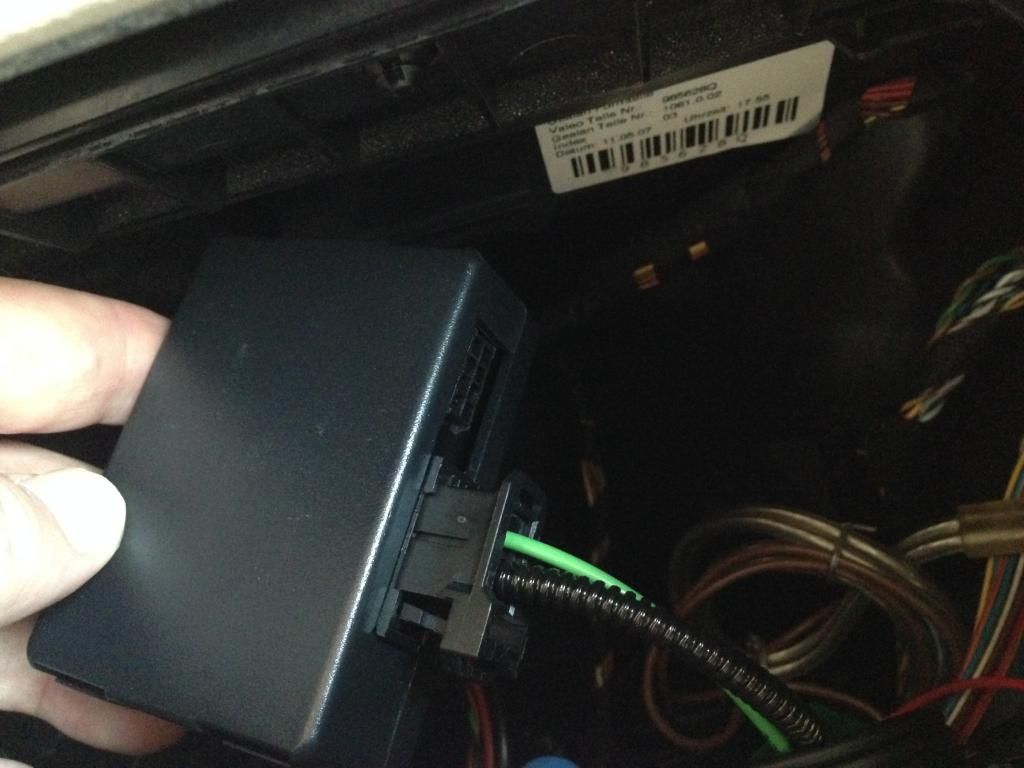 DONT KNOW IF YOU HAVE THE LOGIC 7 SYSTEM? Took some pics recently that should clear things up for those who dont know if they have the Logic7 audio system....(looking down through windshield at the top of the dash). Logic 7 system has a center channel speaker on the top of the dash between the vents: 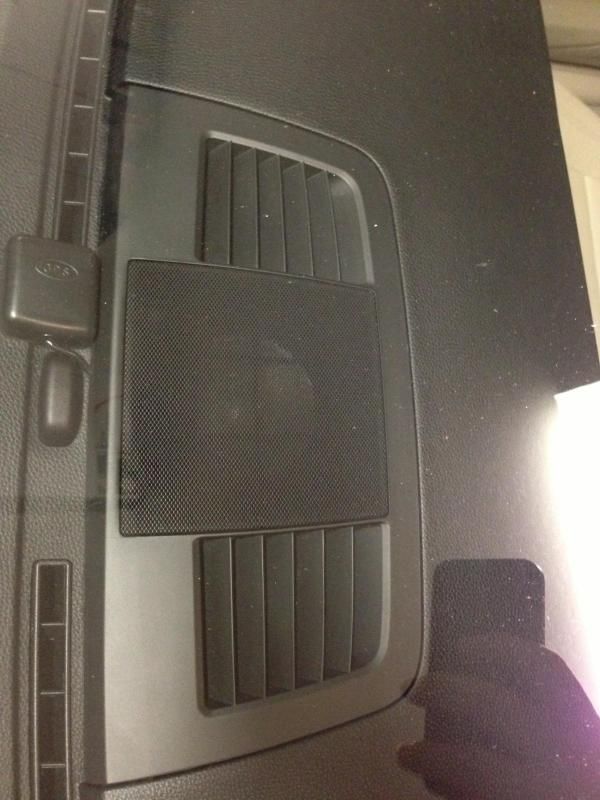 Cars without the Logic 7 system dont: 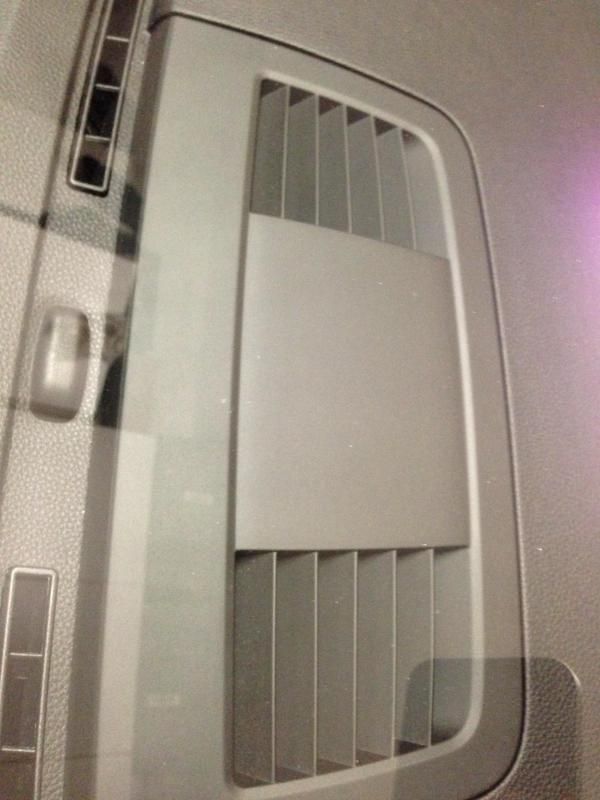 There are plenty of other ways to tell.....but you can see this difference from 20 feet away! Plug in the RCA input/output harnesses if you are using them and the USB cables,  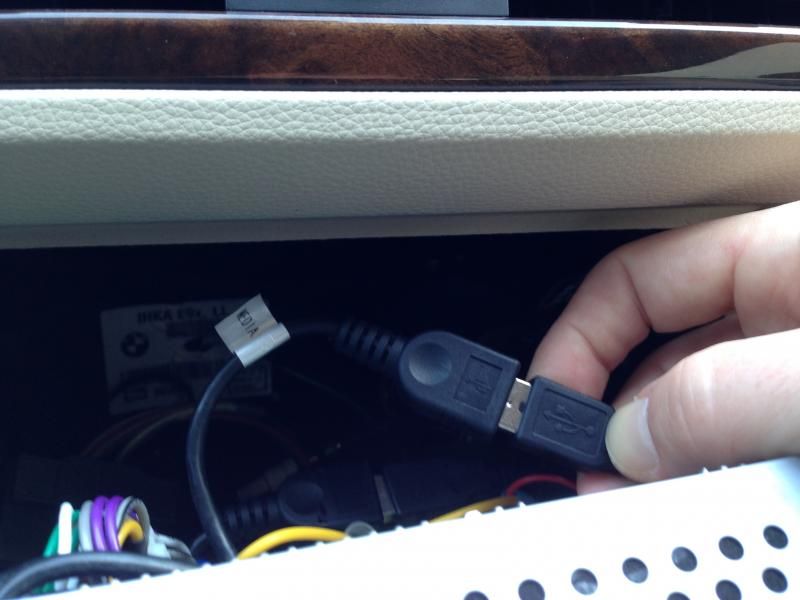 Slide everything partially back into the dash and at this point turn everything on and make sure everything is up and running including the HVAC, if everything checks out, slide it the rest of the way back clipping the bottom spring clips into place and inserting the two retaining screws into place. You MUST install the metal spring clips for the unit to fit correctly on the bottom, they hold the bottom of the unit back flush in the dash opening. 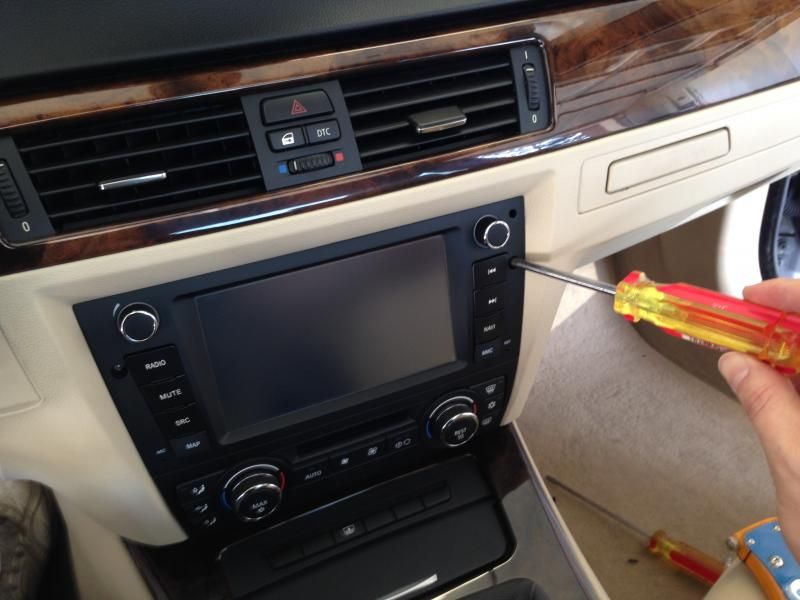 DONE! 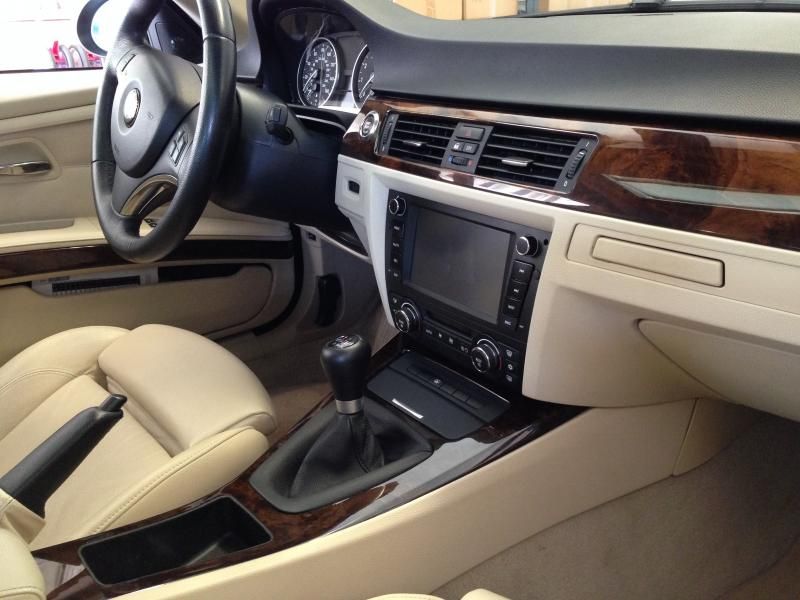 One note on a small speedbump I hit in my install.....I dont know if this will happen on all cars or if it will be specific to certain HVAC controls, years/models/etc.... When I first pushed the unit back into place, the bottom (the part by the HVAC controls) would not go all the way back into place, it was sticking out maybe 1/8". I started looking around and it appears the HVAC controls were a little too deep and they were hitting part of the dash behind them, keeping the bottom from going all the way back and being flush. Specifically this little ear inside the dash where to the oem radio bracket mounts was in the way. 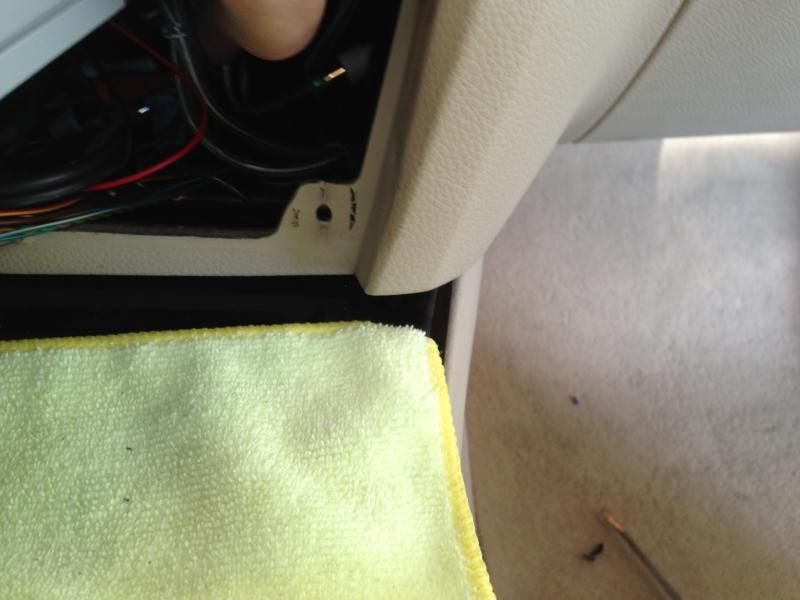 Closer inspection revealed that the part was upholstered with foam and vinyl, AND had a plastic nub on it. Both of these factors added more than 1/8" of thickness to the ear and was keeping the dynavin from going all the way in. So I simply trimmed the upholstery and foam off with a utility knife.  Then I snipped off the plastic nub with some diagonal cutters and cleaned it up with the utility knife. 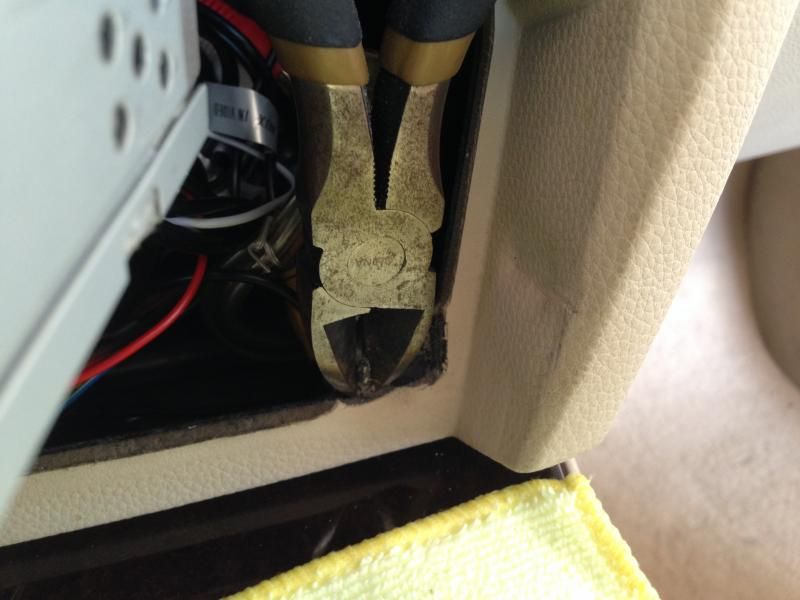 As you can see the ear is still there, its just doesnt have all the "stuff" on it getting in the way 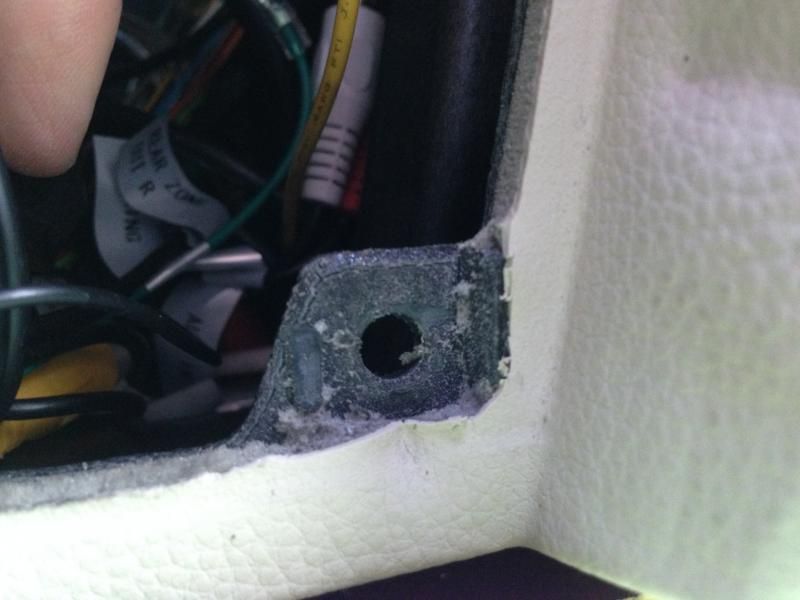 Did the same on the left side and I was then able to slide everything all the way back into the dash and the fit was great  FEATURES Digital Music: IPOD/SD/USB/Internal HD As part of the simplification and refinement of the new N6 user interface the ipod, SD, USB, and the internal 4GB storage functions all share the same basic interface. Simple and intuitive, with selections for artist/album/song/playlist, and in the case of SD and USB, additional selections for folders/video files/picture files. The list can be swiped up and down and there is a scroll bar on the side AND a quick jump alphabetical search allowing you to jump to any letter in the lists so large libraries are no longer a problem to navigate. 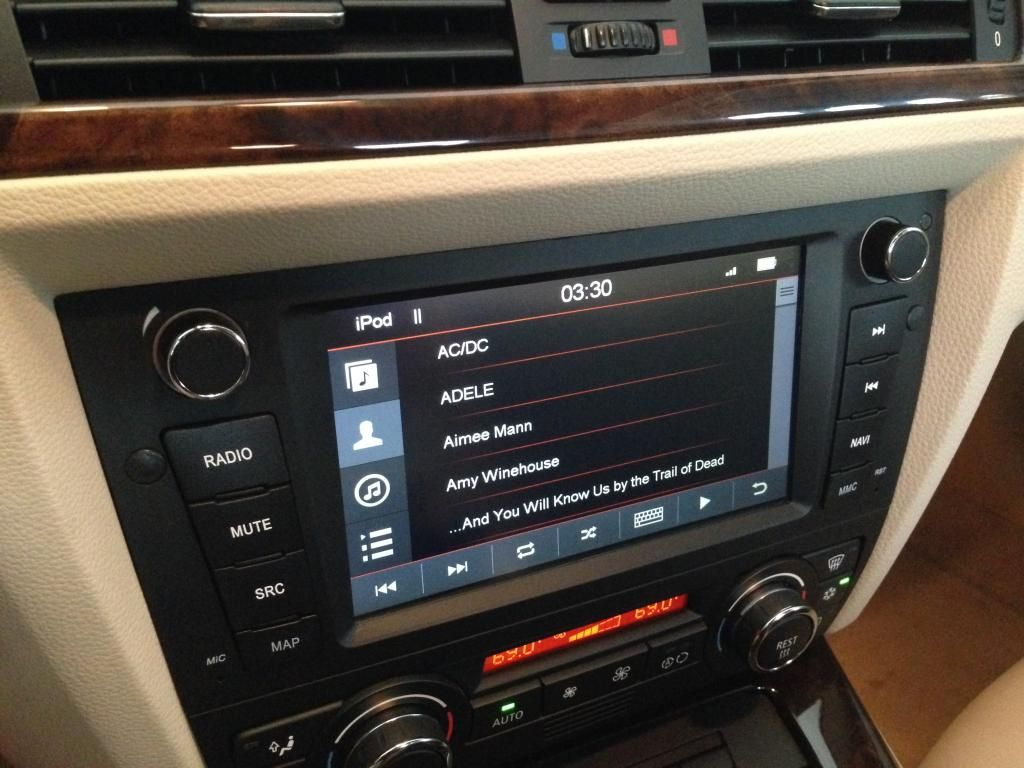 Also in the name of simplicity the ipod now just plugs into the USB plug, no more proprietary cables, no more need for lighting adapters for the newer apple devices. Just use the cables you already have. The unit comes with a USB extension to get the rear mounted USB media plug to the glove compartment, console, etc... and we also have on our website flush mount USB plugs and ipod to USB cables if you want to do something a little more custom. Album art now displays alongside the track info. As you can see, clean and refined is what Dynavin was after here.... Interestingly apps like pandora display similarly (from my iphone at least), displaying track info and album art. 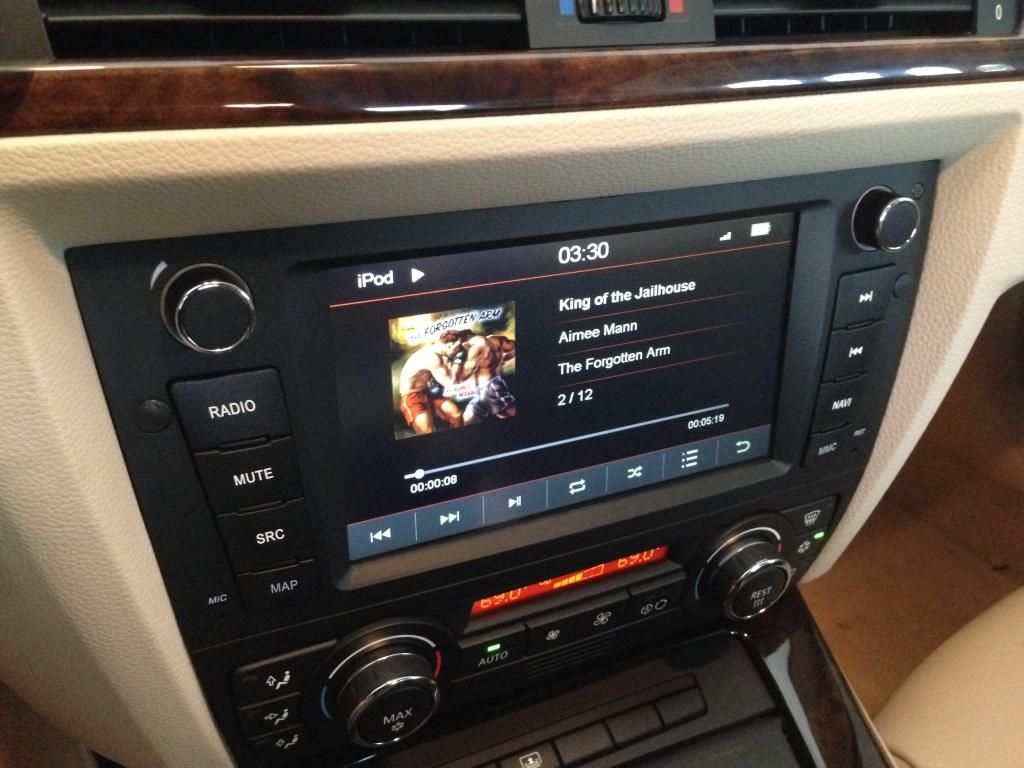 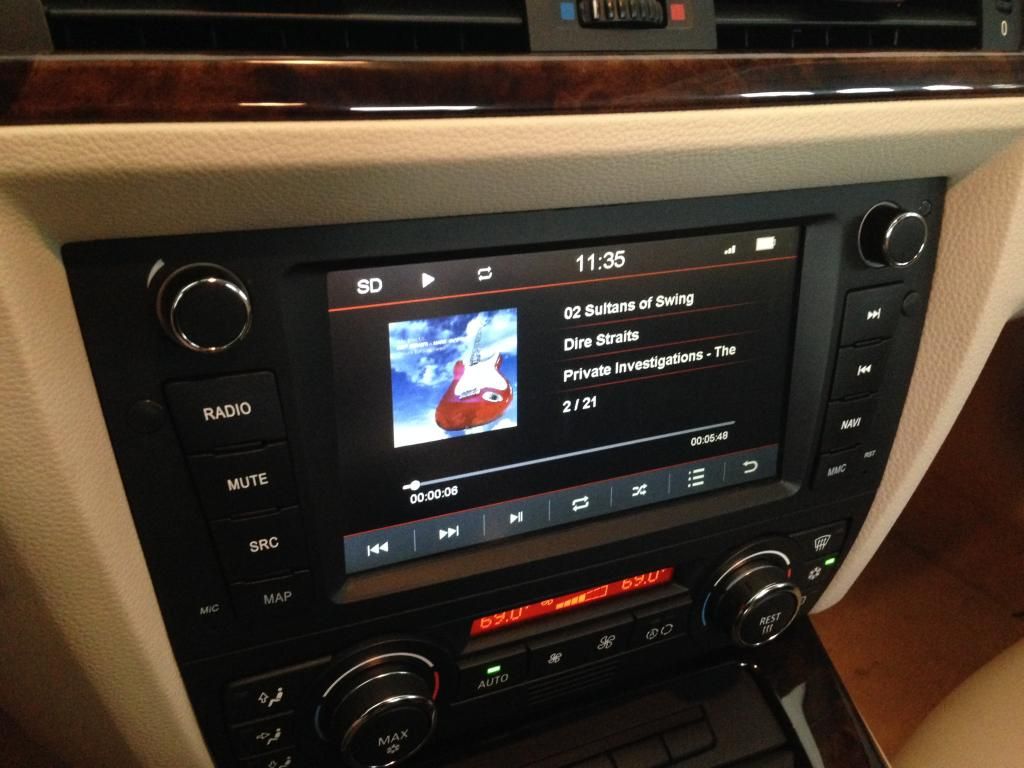 The SD/USB interface will support tags but for speed and control I like a well organized library with a properly laid out Artist>Album>Song directory structure and properly tagged album art, etc.... I used the program Media Monkey to organize, tag, and load up a 64GB SD card so now I have my entire 50GB music library in my car with no external devices! It was tedious as hell but now that its all set up it works great. The SD card loads very quickly, if you try to use the artist and album tags it takes a while to sort them all out but if you just use the folder directory its almost immediately available: 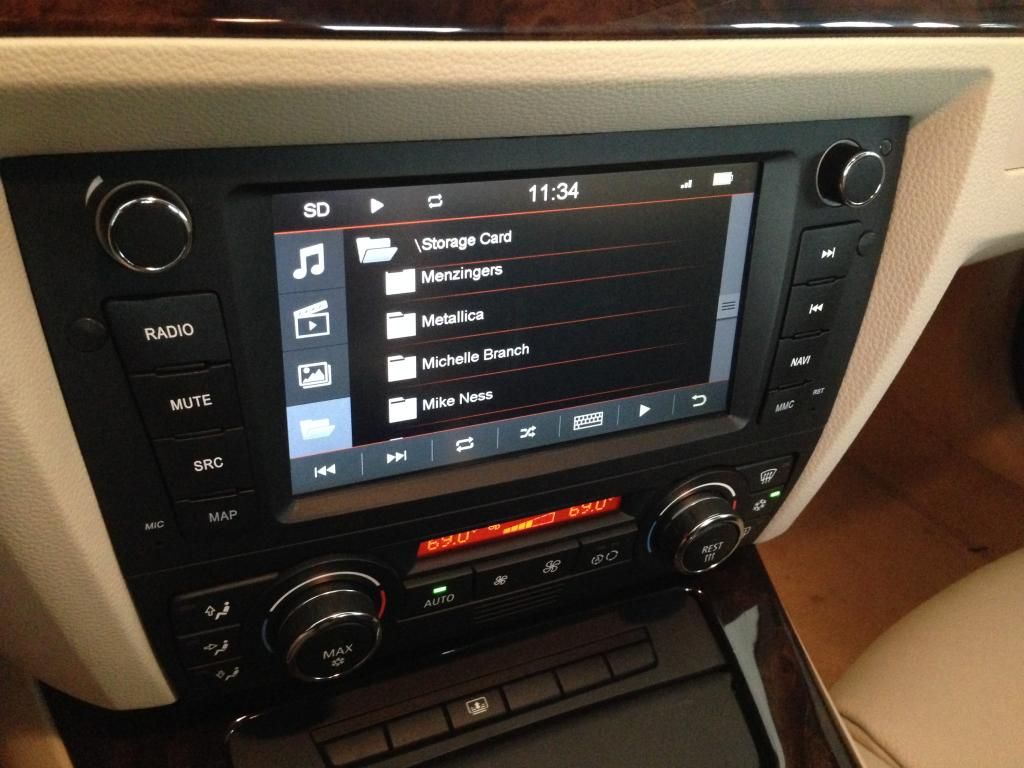 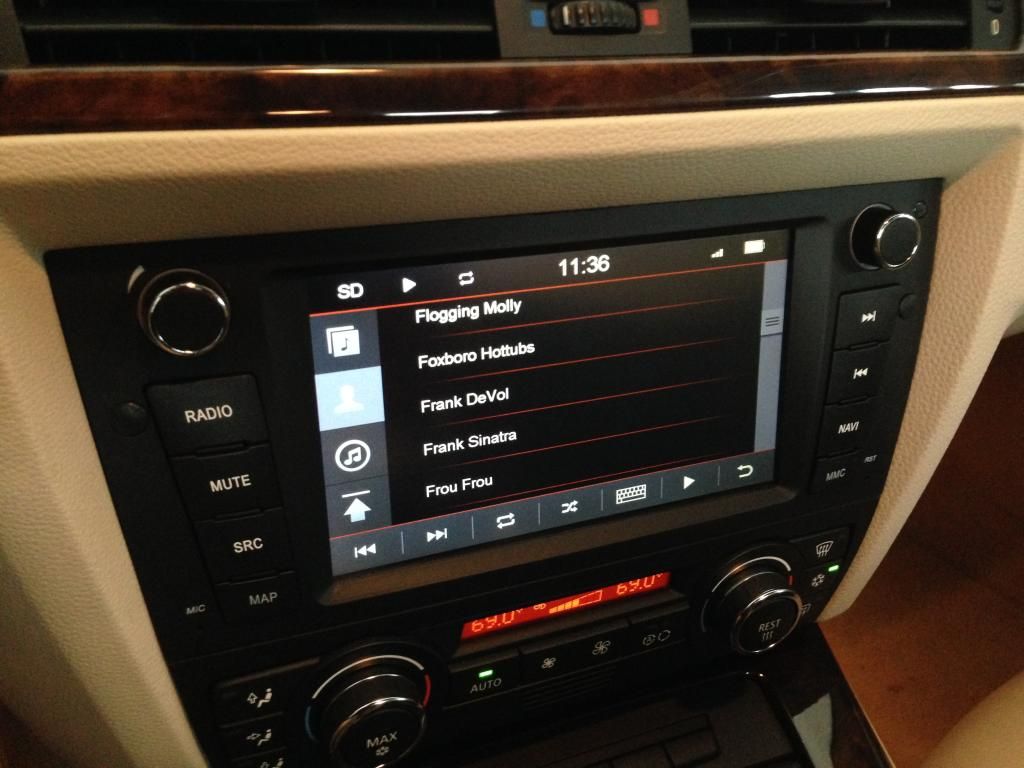 Album art even displays when searching by album or song:  For those of you interested in higher end audio the unit will play lossless files, In my testing FLAC files played fine from USB and SD and Apple lossless (ALAC) played fine from an ipod. 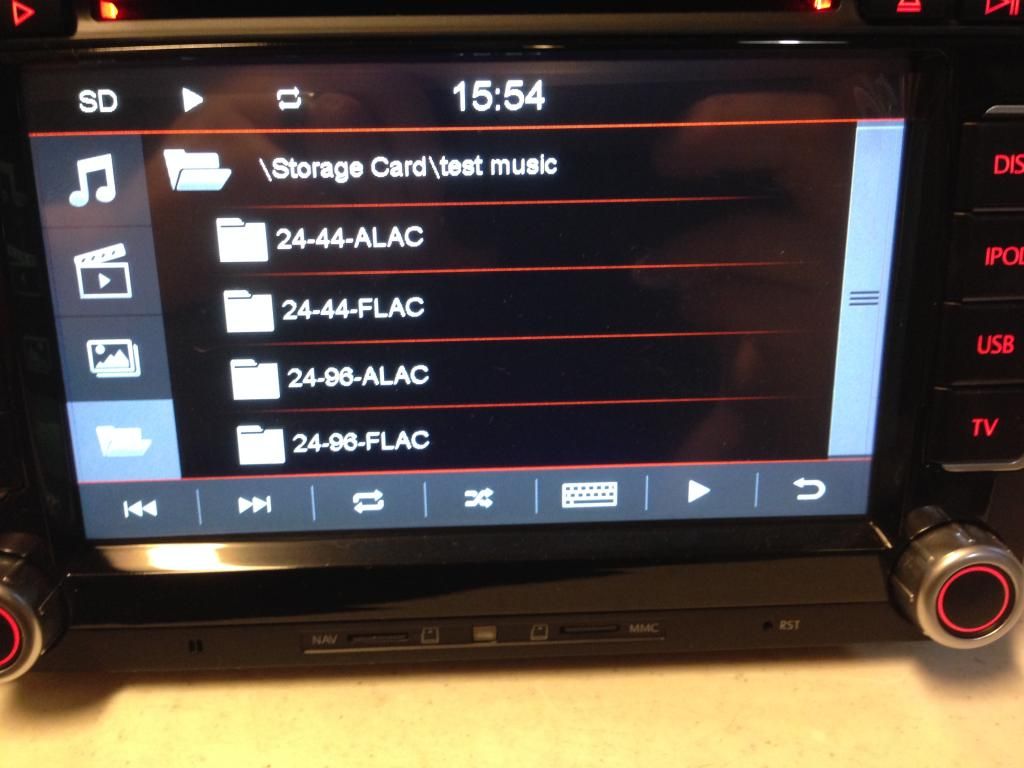 Source Selection Screen Like previous Dynavin units the MODE button brings up a source selection screen, large easy to press on-screen buttons display your most used sources for easy selection. You actually don't see these screens much....only when switching sources or getting into the settings menus. 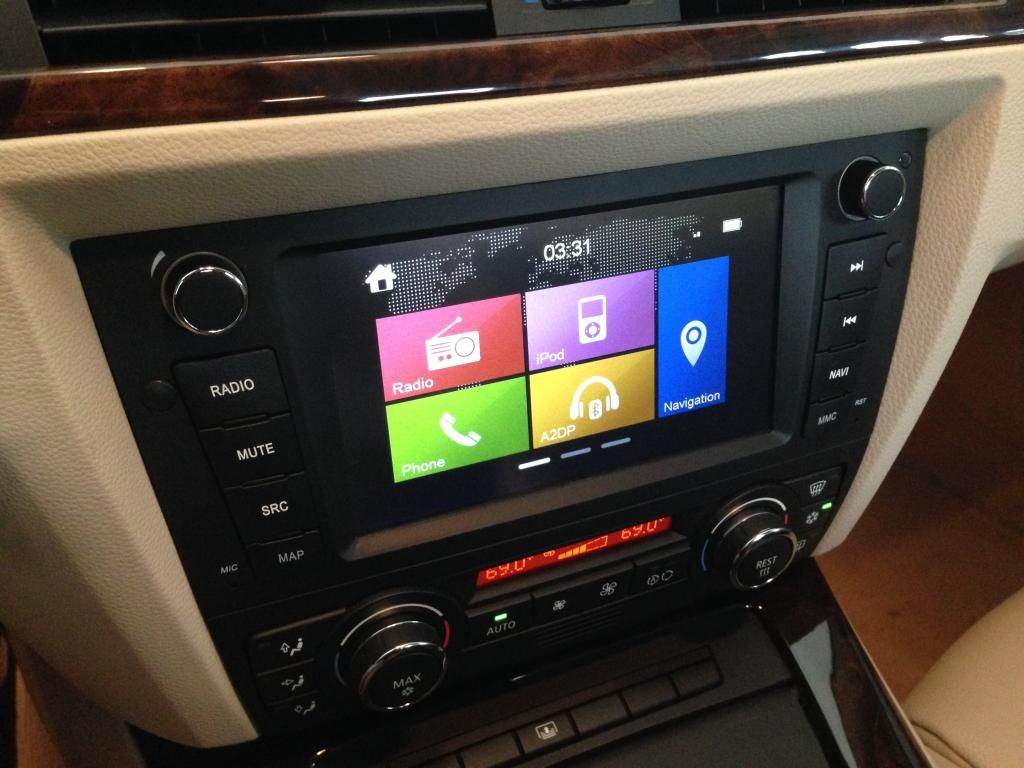 Swiping the screen side to side reveals a selection various settings menus and ALL of the potential sources. 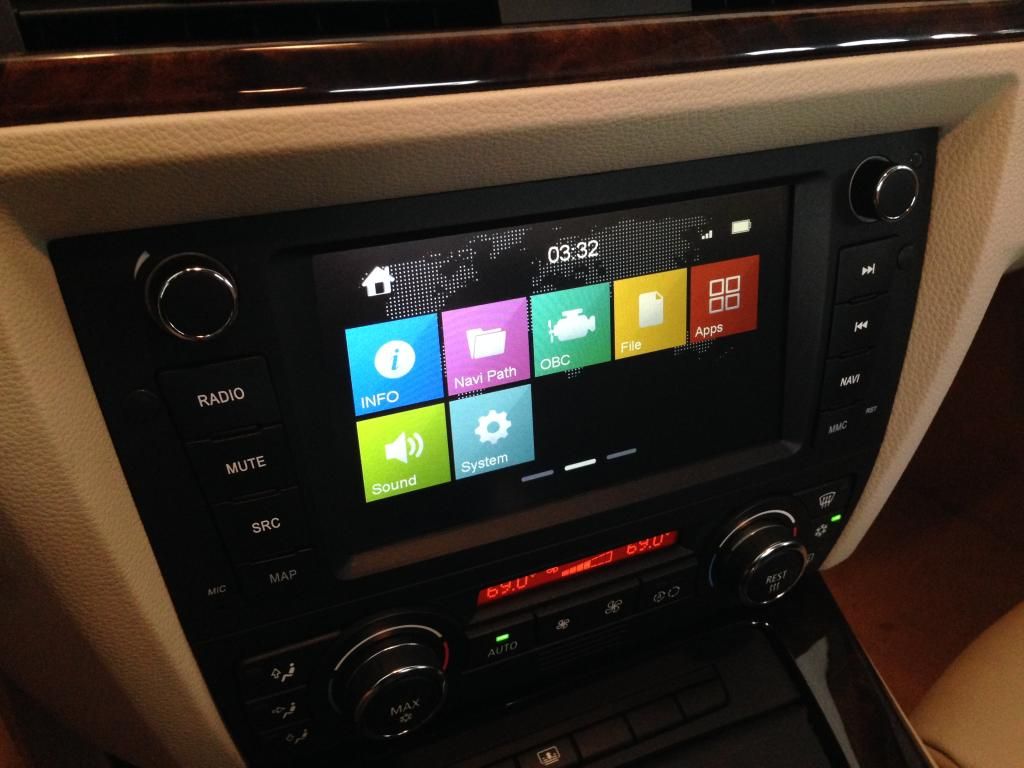 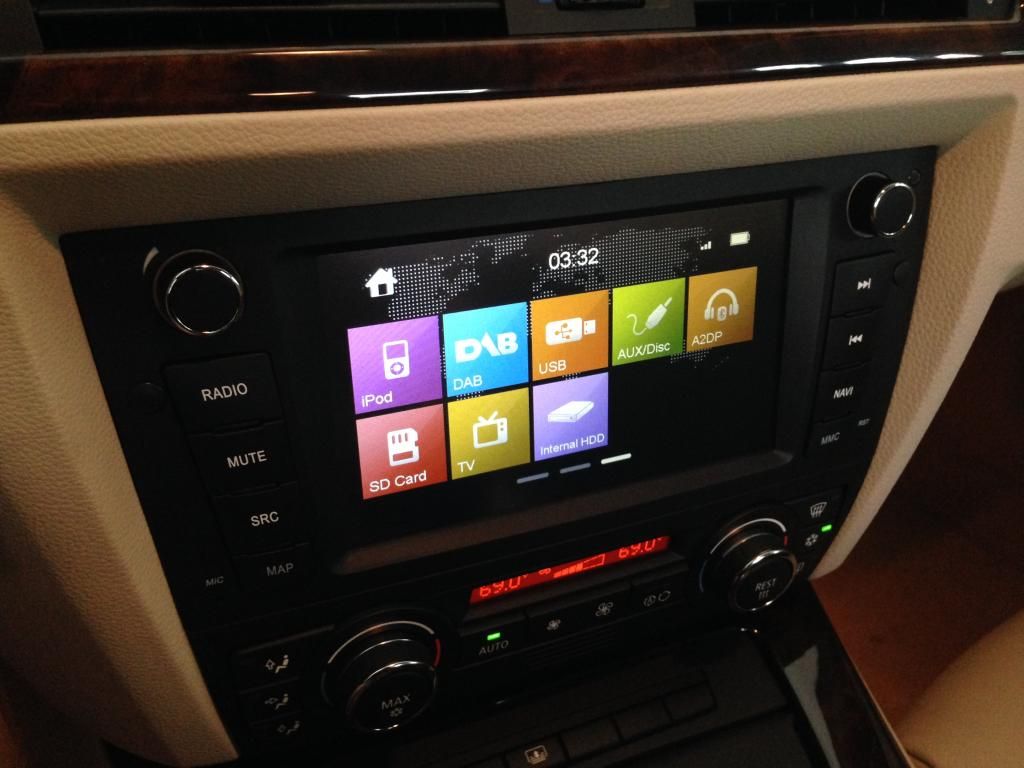 While the Radio, Phone, and Navigation buttons are fixed on the home screen the other two are selectable so you can put your most used functions there for easy access. BLUTOOTH PHONE Dynavin continues to work with Parrot on the bluetooth system, its now cleaner than ever, will display your phonebook, and has a quick alphabetical search function to jump to any letter in the alphabet. As before it works with the phone buttons on your steering wheel. There is a built in mic AND an external mic, as before I recommend using the external mic as it allows you to experiment with its location for best results. 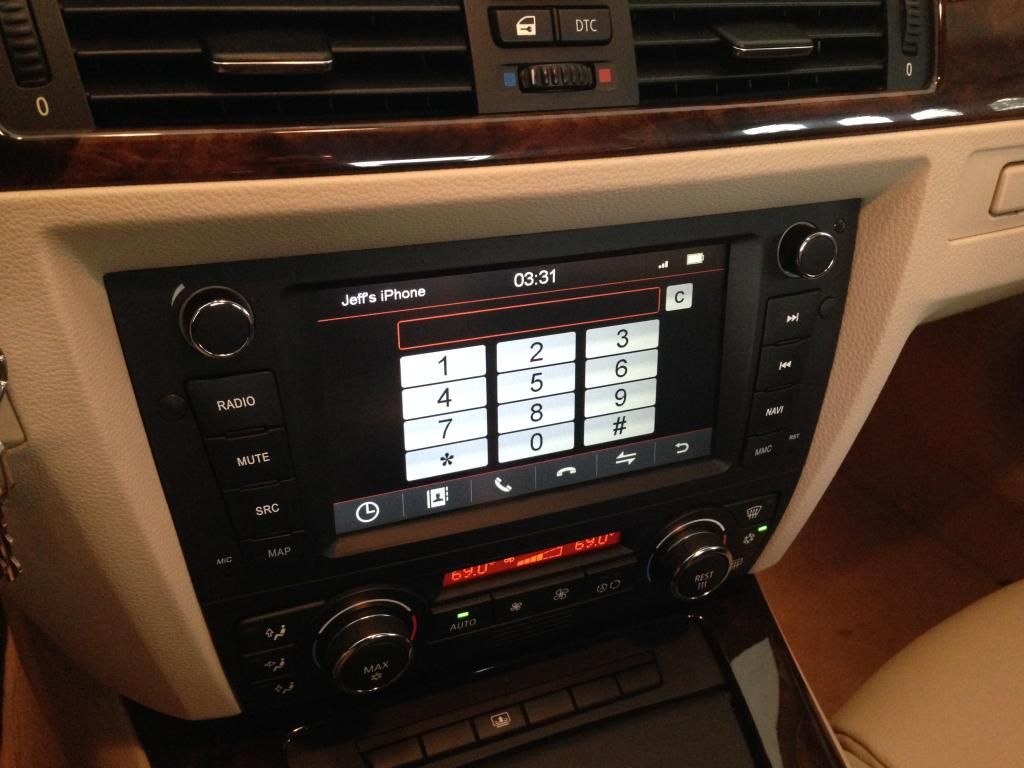 BLUETOOTH AUDIO STREAMING (A2DP) This is another big step forward, the Bluetooth audio streaming quality is now as good as plugging in, It connects pretty much immediately and works with apps like pandora, stitcher, etc... in addition to your standard media apps. In addition track info is now displayed on the screen:  The steering wheel control buttons work as well, including in apps like pandora. I find that this is now my go-to choice as a music source. RADIO, CD, DVD etc... The radio is what you would expect, 15 presets, RDS, Pretty standard stuff here. Settings for different regions etc... The unit plays CDs, DVDs, etc.... same as before. 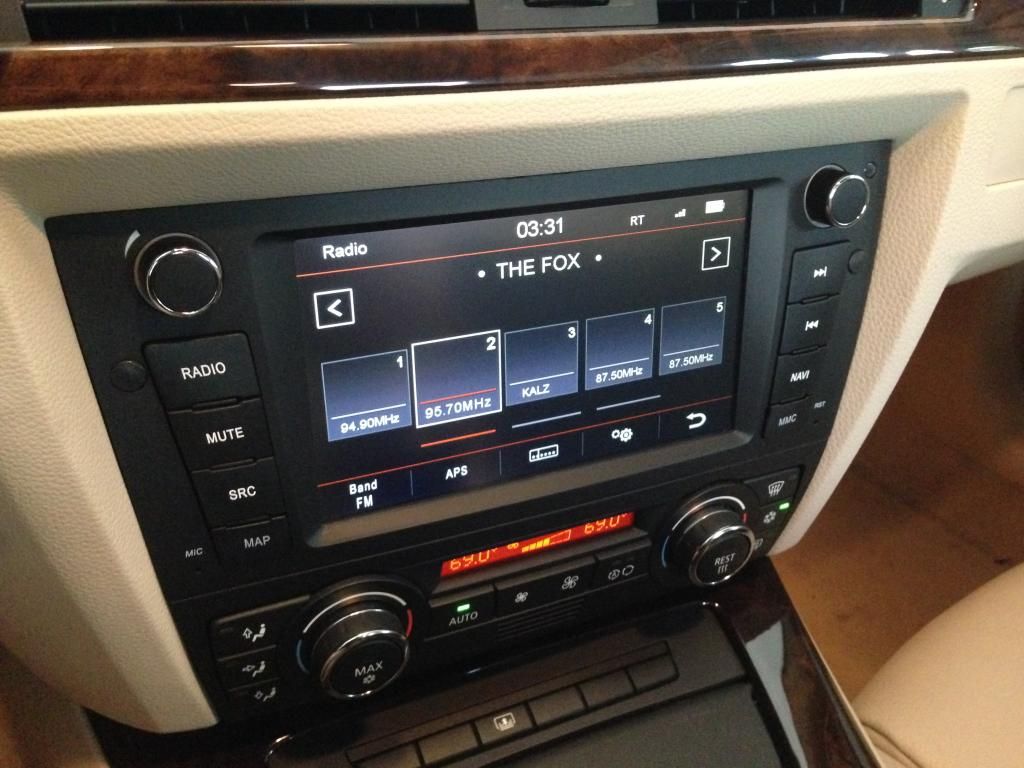 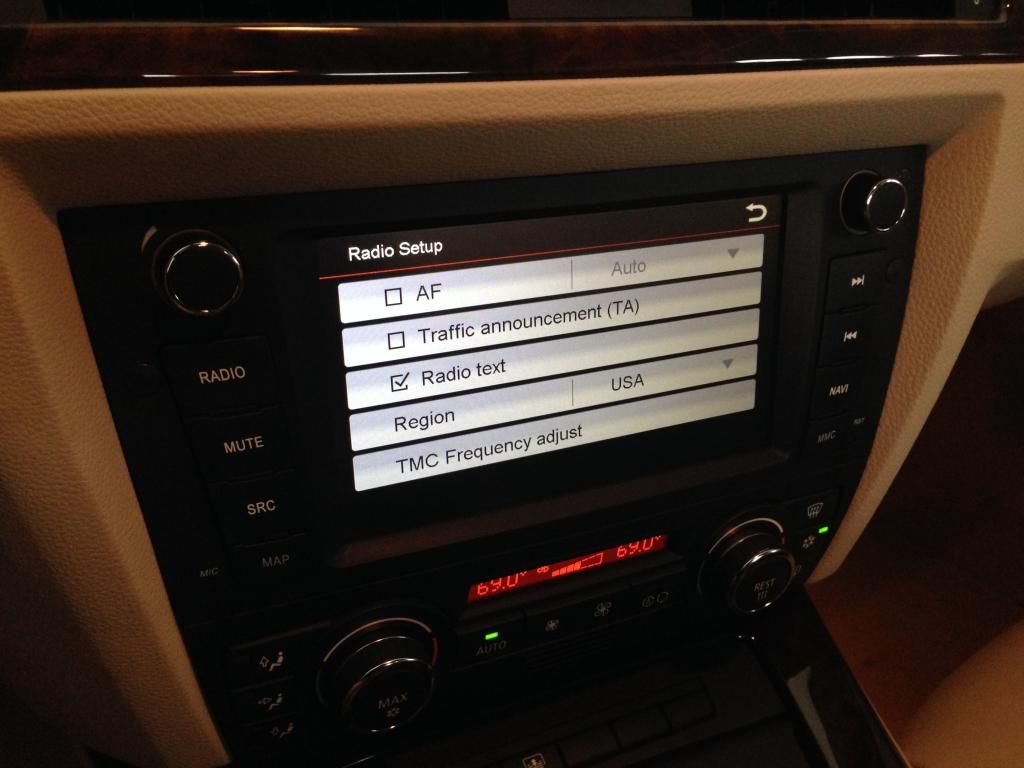 NAVIGATION As with previous dynavin units we are able to offer our units with pre-installed, licensed iGo Primo on our Dynavin units. This program has long been a favorite of the "hacker community" and I know some of our competitors are pirating it but Im glad to say we can offer it to everybody in a legit legal way. The licenses are not cheap but we include Primo with all of our Dynavin units. This also greatly simplifies things like future map updates etc... as iGo is well established and has an easy upgrade path available via their websitewww.naviextras.com Its clean and intuitive, easy to quickly search and enter addresses, all the maps are already on board so no internet connection is needed. 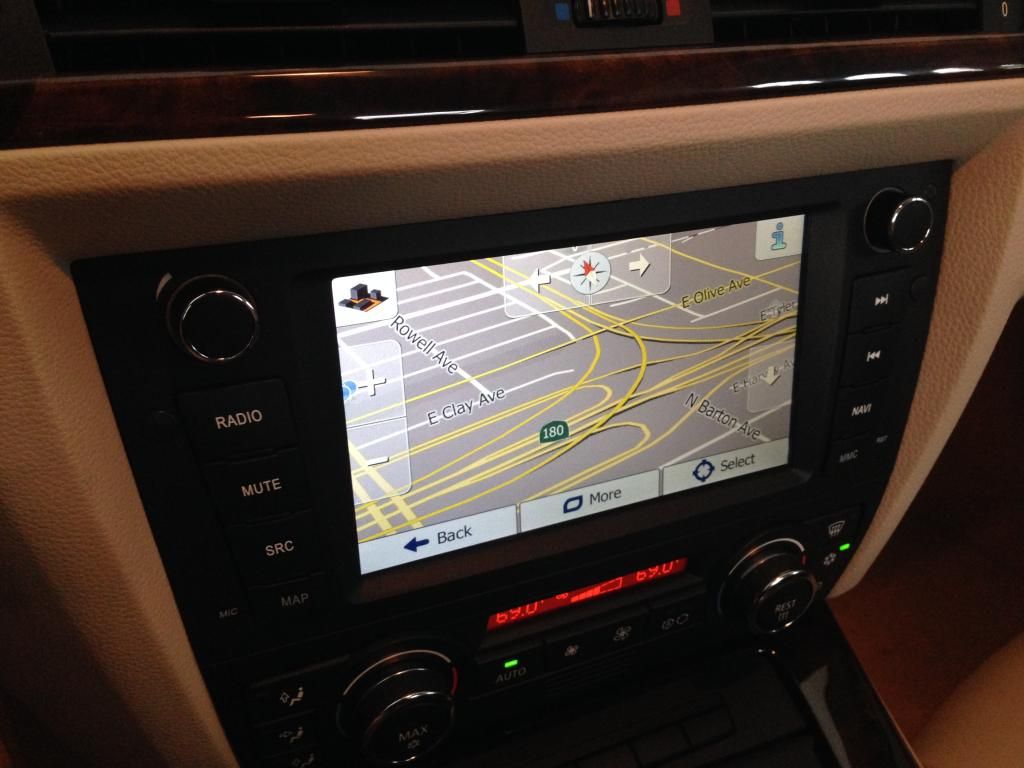 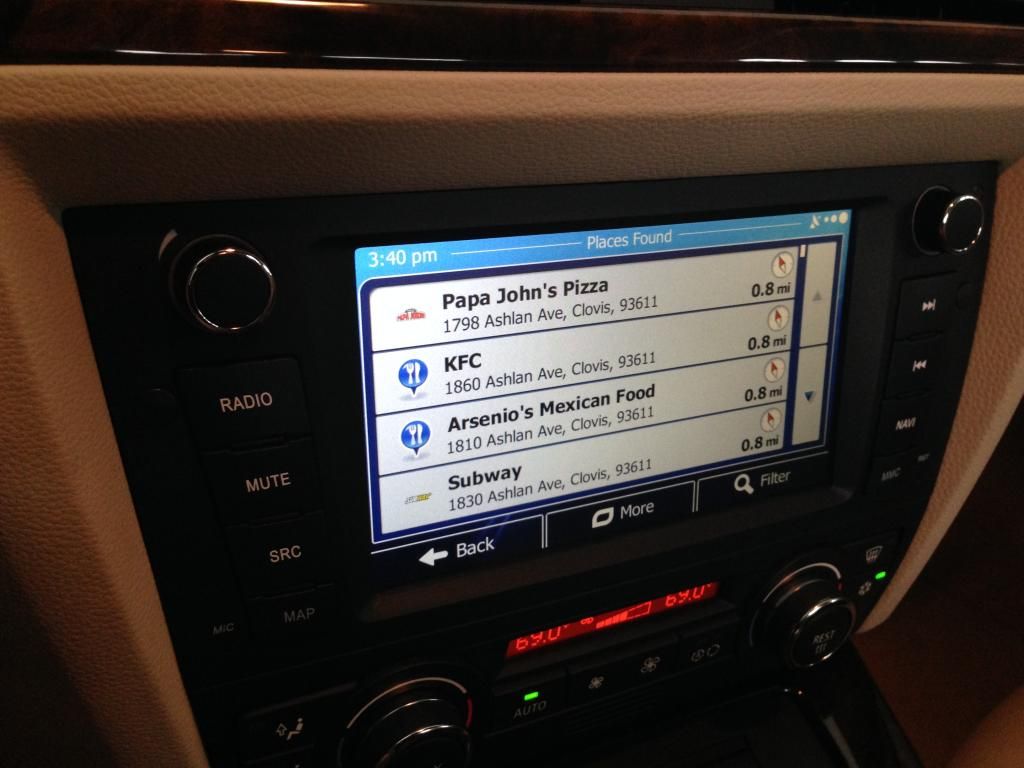 The new N6 unit has an option to overlay the current media info over the nav screen, displaying track info and album art 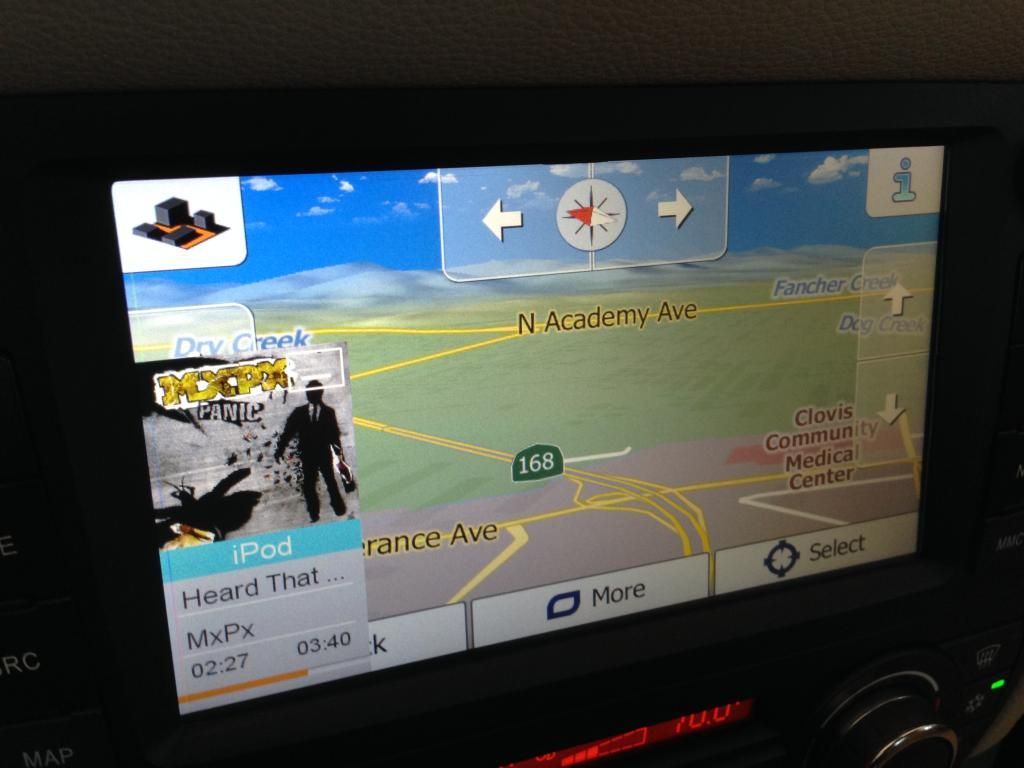 REVERSE FUNCTIONS AND WARNING CHIMES As always the new Dynavin N6 will work with a reverse camera, but dynavin continues to refine this function to work with PDC (parking sensors, if your car has them) and is completely configurable within the settings menu. You can have just a backup camera, PDC, backup cam WITH PDC displayed, or nothing at all. In cars that have canbus connected steering angle sensors the unit can even display parking assist lines that move based on steering angle, this is model dependent and remains to be seen what all cars it will work in....but for those where it does its some cool eye candy: 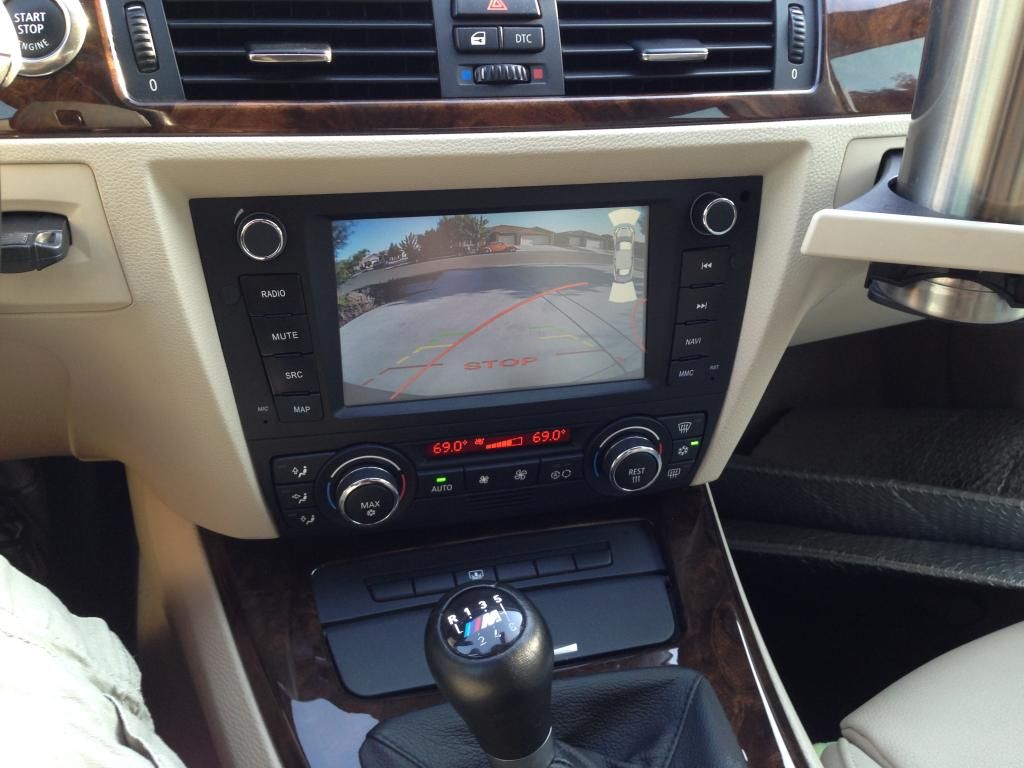 Some E90s have warning chimes integrated into the stereo system so when you remove the head unit you loose the chimes. Dynavin has addressed this and has built in these warning chimes, they are adjustable and can be turned off for cars that have the speaker in the gauge cluster. The chime is not a copy of the oem "goooonnnggg", its just kind of a generic "bong" sound....its pretty soft sounding though, fairly unobtrusive, sounds good to my ears. The PDC sounds pretty close to the stock BMW PDC sound and does move left or right depending on where the object being detected is. You can see it displaying in the PDC display in the upper right as well. Also note the park assist lines as the move with the steering. Of course for them to even close to accurate you will need to play with the angle of your camera. Here is a short video....First the warning chime (in this case I left my door open), then the reverse PDC beeps. The volume is adjustable, I have it turned up louder than I would typically have it in order to hear it well in this clip....I like that you can turn it down lower than it would be stock. AUDIO FUNCTIONS Here is where some of the biggest changes are.....Dynavin is going after a higher end market and as such has added a lot of good audio features to the new N6. Time alignment, three band bass/mid/treble AND a 5 band EQ with separate sub control, 4 volt RCAs for clean signal transmission to aftermarket amps, and 24bit burr brown D/A converters....you old school audio guys will know what thats about. 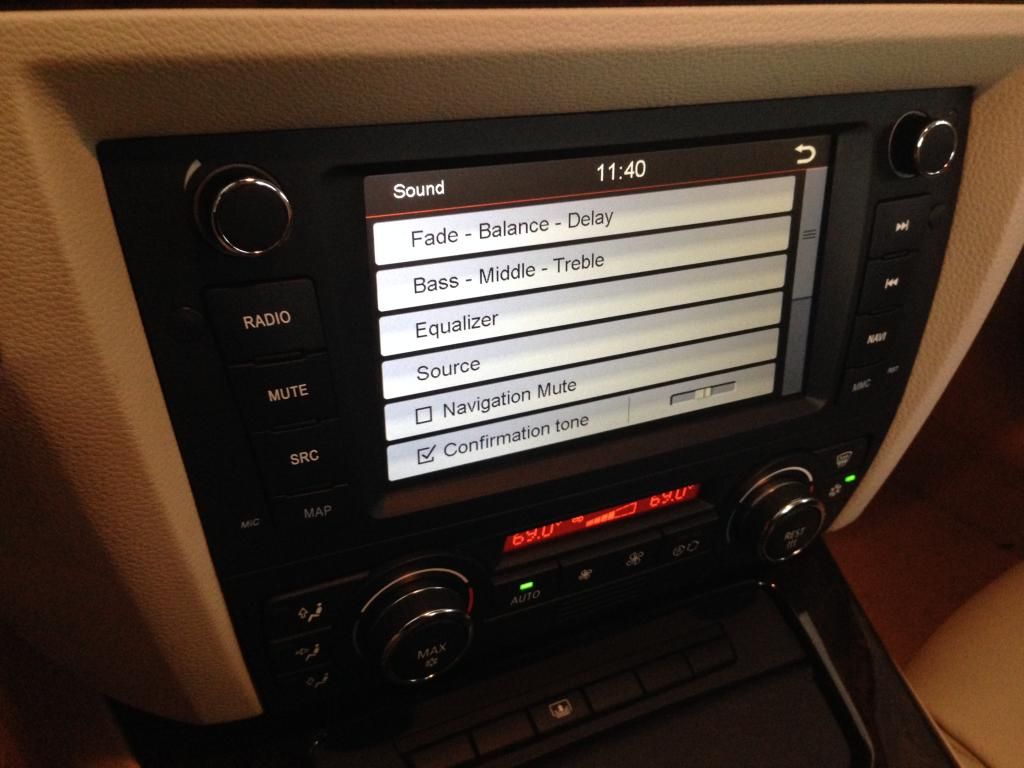 Most of you guys probably dont know what time alignment is or what to do with it but its probably the single biggest factor affecting sound quality in a car stereo environment, this adjustment allows for you to delay the speakers at the 4 corners of the car independently so that the sound from each reaches your ears as the same time....basically putting YOU in the "sweet spot". Ive been running time alignment of one kind or another for a couple decades now, in my opinion its a MUST HAVE for any higher end system. One thing to keep in mind though is setting this wrong can also make your system sound terrible so its important to at least understand the basic fundamentals of time delay before you jump into this setting. Also keep in mind this is optimizing ONE spot in the car at the detriment to the other seating positions. So if you regularly listen to music with passengers you may not want to use these settings. 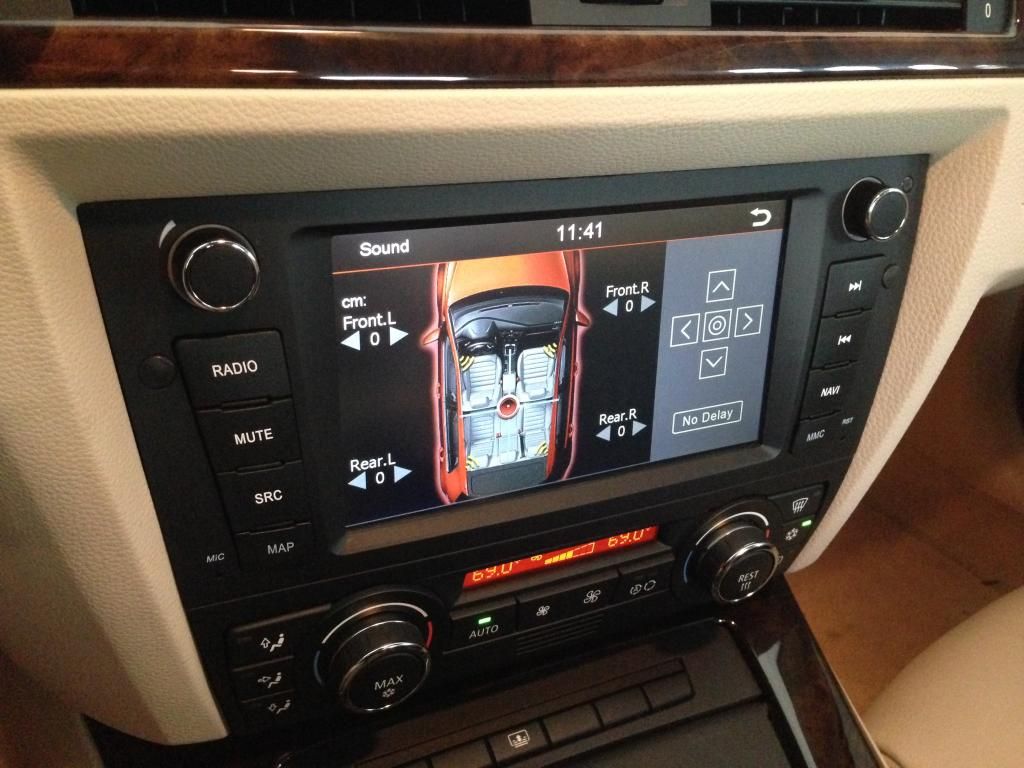 5 band EQ, self explanatory: 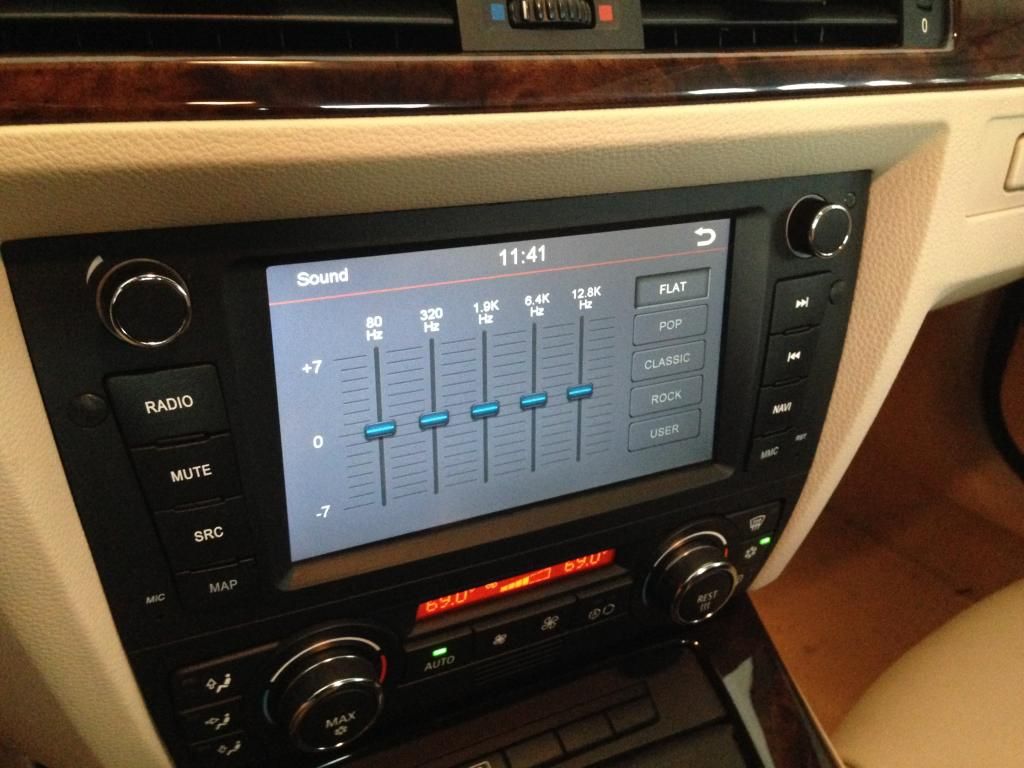 Tone Controls with Sub Level control 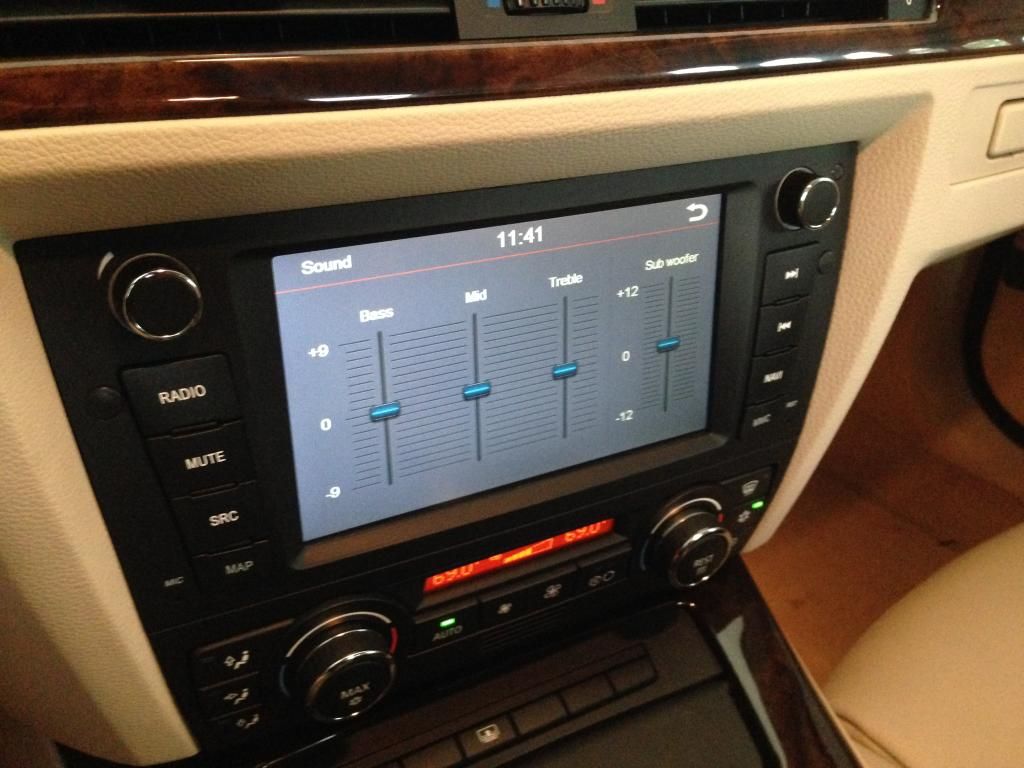 LIGHTING AND SCREEN ILLUMINATION Dynavins have always had matching button lighting, not a big deal, but FYI, the buttons match the other buttons in the car and dim with the dash light dimmer. Nice and OEM. Now this next thing may not sound like a big deal at first, but for day to day, real world use....its HUGE. The LCD dimmer can be configured in multiple ways and the dimming amount is fully adjustable. There is now an onboard ambient light sensor as well. SO you can set the unit up to dim when your headlights come on OR when the sensor sees its getting dark, or you can dim it manually. There are pros and cons to each approach and the overall ambient lighting where you are at and your headlight use habits will dictate which setup will work best for you. The adjustable LCD dimmer looks great as it does not just darken the screen as most "dimmers" do, it dims the backlight, so there is no "LCD glow" at night. Between the nicely dimmed screen and the clean white/red on black interface this is the best looking aftermarket unit at night ive ever seen 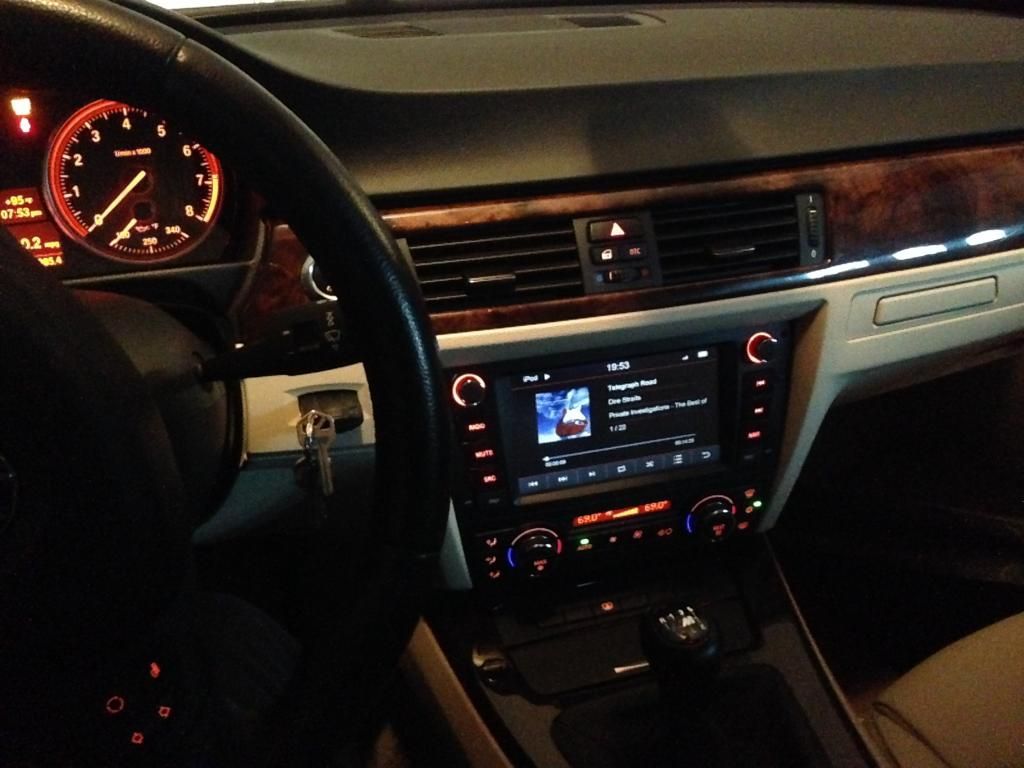 ETC... A word about start up.... The N6 has about a 20 second boot time BUT dynavin has done something clever, the unit starts booting when you unlock or open a door.... and it does not fully turn off until about 20 minutes after you shut the car off, it goes into a standby mode. So in regular use, running errands, that sort of thing, you rarely see the boot screen, or if you do its only for a few seconds. I like things clean and OEM so I went with this in my personal car.... 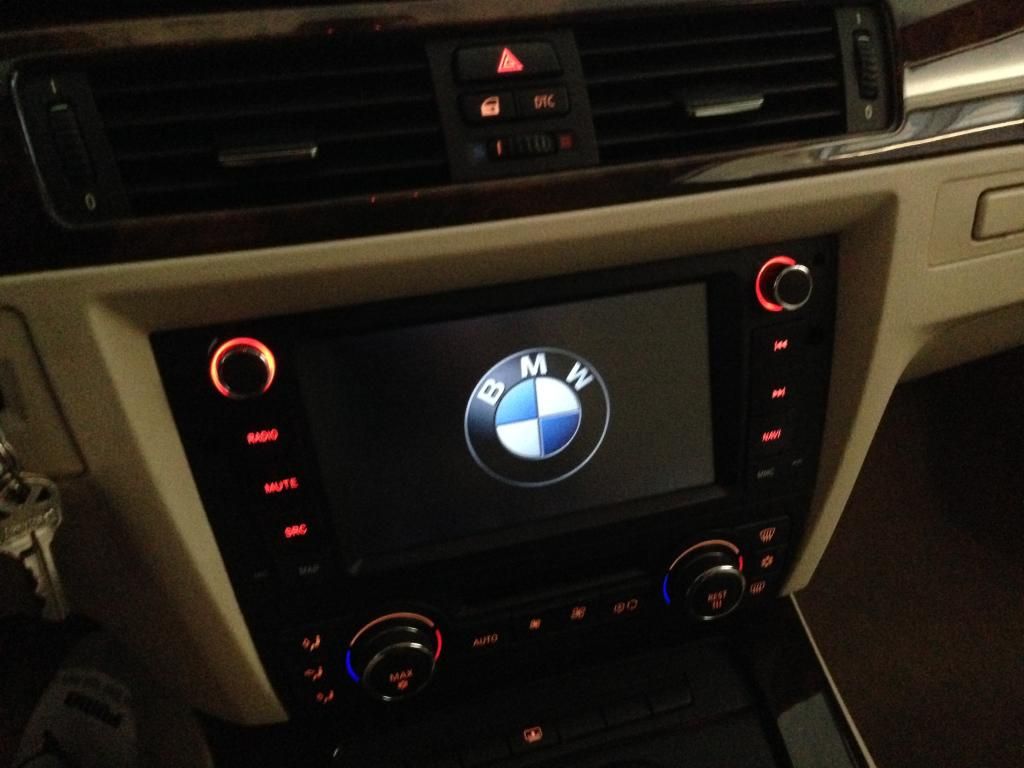 I think I might like this one better though.... 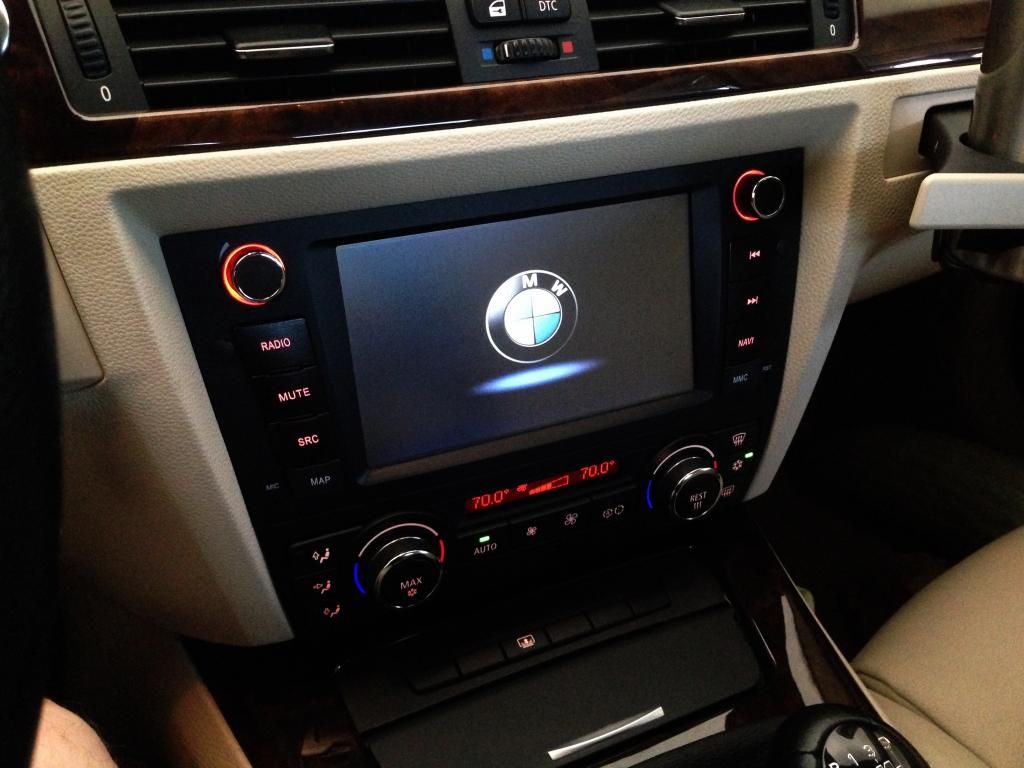 Here is a quick look at some of the other car integrated features: OBC data screen (update: now with US units) 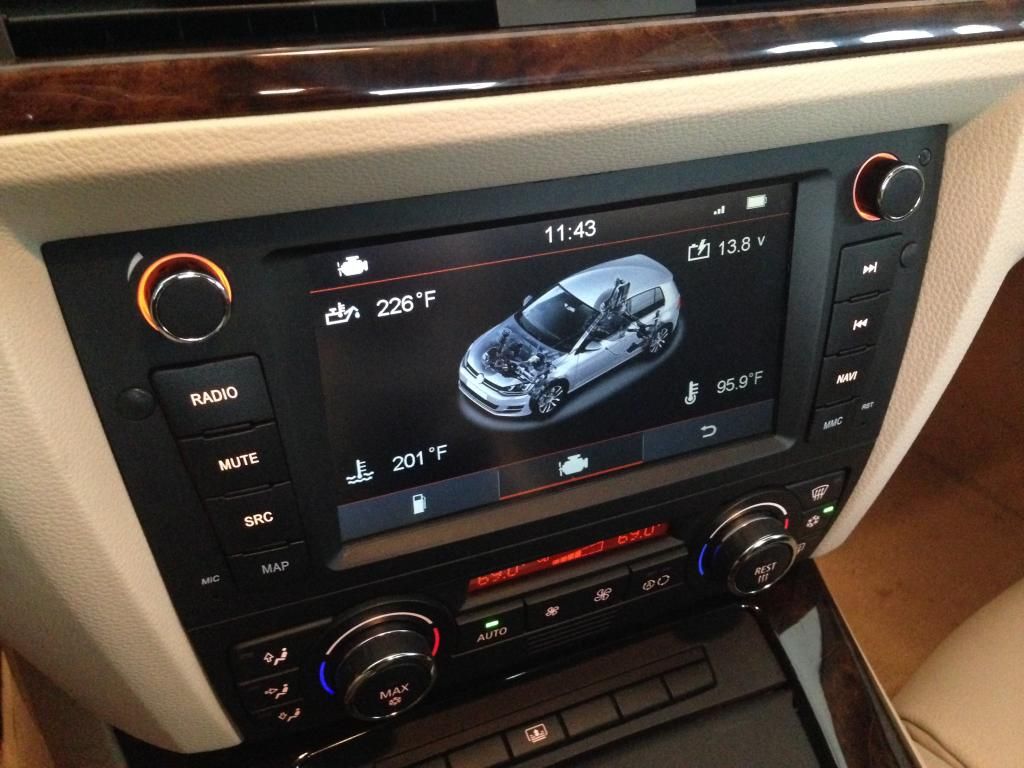 OBC fuel data screen (update: now with US units) 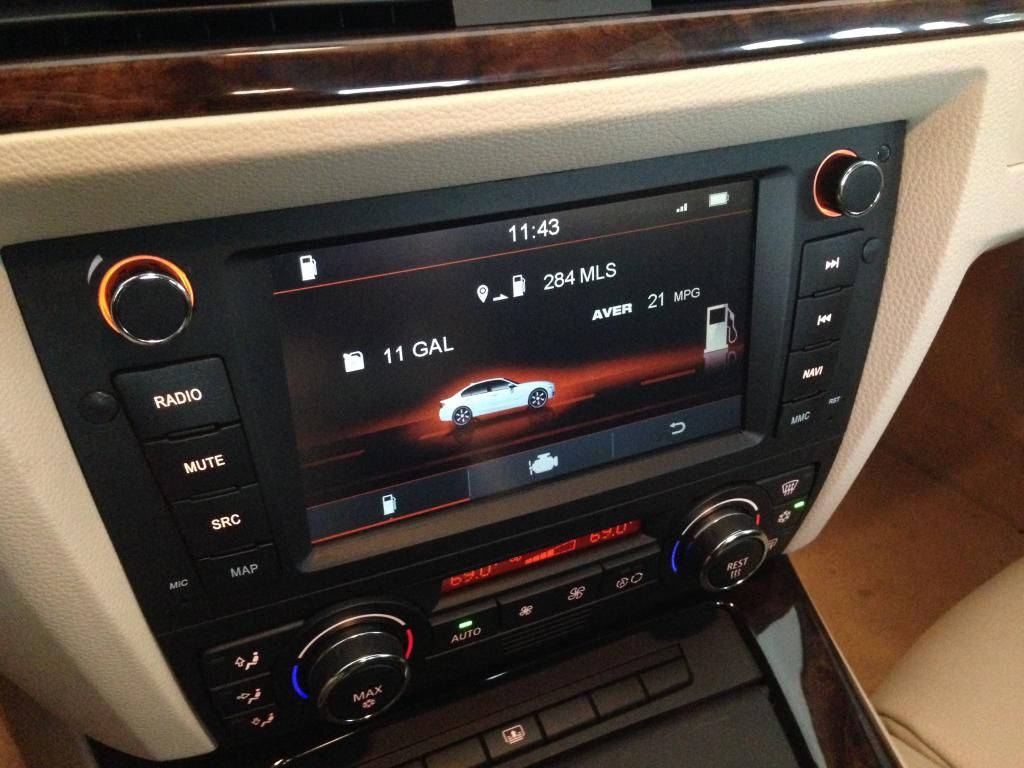 HVAC display, pops up for a few seconds when you make changes to the HVAC settings (this can be turned off) 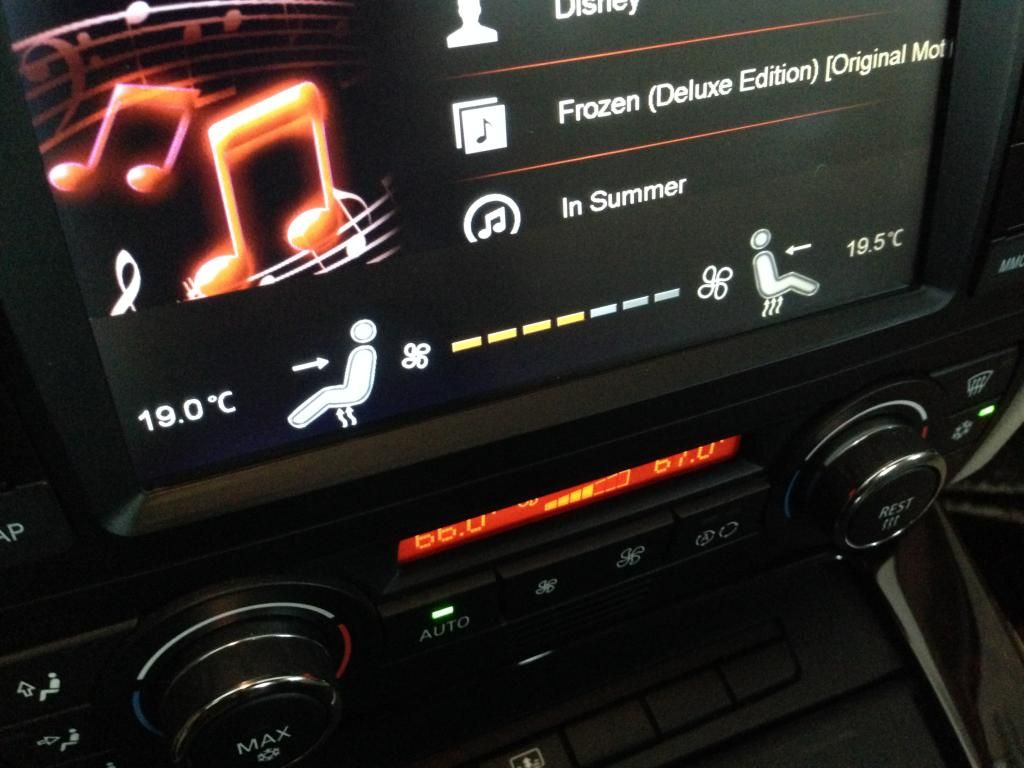 Dynavin went to an oem style Fakra antenna plug on the unit so that the cars antenna can plug directly into the unit without any adapters. One less thing to install, one less thing to go wrong. For those of you with the old style antenna they provide an adapter. 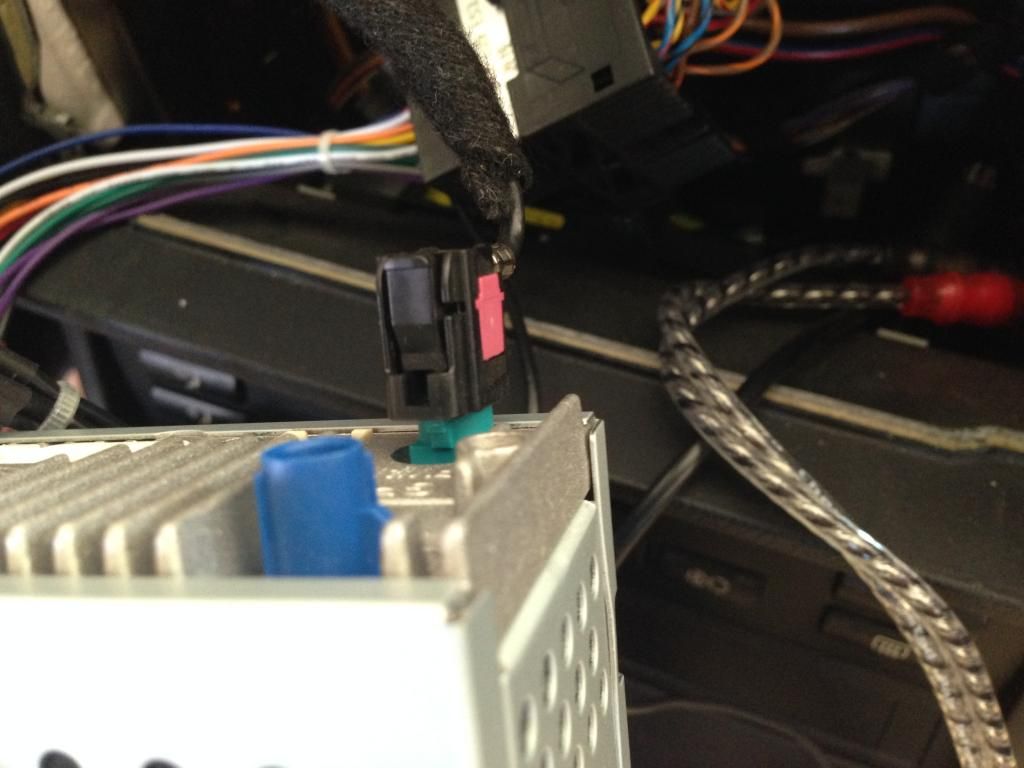 Finally, a word about updates. Dynavin is really pushing the "DynOS" thing on these units. They have built into the unit (and their new website) an easy update path so that as they develop and activate new features it will be easy to update the units. The current units are running DynOS 1.0.0. so its clear that they intend the current unit to be "generation one" for their software. Its fairly finished as is, but I guess they have things in the pipeline. I was skeptical of this approach as marketing this as a feature obligates you to use it but Dynavin assures me they have plans in this regard and they have given me a few details about things they are working on. Dont expect huge, earth shattering, changes. But just know that there are further refinements and a few interesting features in the works and as time goes on these will be easy to apply to existing units. | |
评论 HINTS, TIPS, AND HIDDEN FEATURES Ill be adding little hints and tricks here as I run across them and people ask about them. REBOOT Since the N6 does not actually turn off with the key but instead goes into standby mode for a period of time, getting it to reboot could be a tedious wait....but you dont have to, just hold down the source button for 6 seconds and the unit will reboot. UPDATES Go to dynavins website for the latest firmware updates, go to the product page for the unit that you have (N6-E9X in this case) and scroll to the bottom to see the DynOS firmware link, http://www.dynavin.com/products/n6_e9x.php Its easy to update and the instructions are in the download link but to reiterate, download the files from dynavins website, extract them and put the 3 files on an SD card. Put the SD card in the MMC slot in the dynavin, go to the "info" setting on the second home page and press the blue "update now" button. Then just wait for the unit to run the update, it will restart when its done. If you are using the same SD card that you keep your music on, delete the update files from the SD card when you are done. US UNITS AND 12 HOUR CLOCK DynOS 1.0.1 or later required....see above. The dynavin by default will display all the OBC screens in metric and the clock in 24 hour format. There is now a setting in the system settings menu to select EU or USA for the unit, change it to USA and you will find that all the units are now SAE and the clock is 12 hour. Keep in mind that there are some other regional settings such as the radio region setting (European or US frequencies) and of course all the navigation related regional settings....these settings are in the specific radio or nav settings menus. TIME ALIGNMENT What is time alignment? In a car you sit on the left side, placing you closer to the left side speaker, so the sound from the left side gets to your ears before the the right side and greatly reduces your sound sound quality. The goal in high end audio is to create a solid aural image of each musician at a certain point in space on a a perceived soundstage. By delaying the near side channel we can bring the sound back into "alignment" and put you in the "sweet spot." Sitting in the drivers seat measure the distance to each speaker (the front and rear mids in the case of the E9X). In my personal car it looks something like this: FL: 28in (71cm) FR: 48in (124cm) RL: 24in (61cm) RR: 42in (107cm) Take the longest distance and subtract the other distance from that number... So we end up with: FL: 53cm FR: 0cm RL: 63cm RR: 17cm In a recording there are sounds and musicians to the left, the right, and the center, it's the center that we are concerned with here. Most of the time the drums and primarily the vocalist are in the center. We want to select a music track that has some space in it so we don't want a heavily overdubbed recording with lots of backing vocals....too much noise. Set the fader to the front so we are only hearing the front pair of speakers. Enter the delay numbers above and put on some music. It should sound pretty good. Then raise one side of the delay settings, say the front left. As you do this you will hear the sound change, it will become hollow, out of focus, kind of a "in a tin can" kind of sound, your front speakers are now out of phase. Then lower the setting, as you pass the correct setting you will hear the sound come back into "focus", the vocals will move to the center of the car and become more solid. Keep going and you will hear it go out of phase again. Now go back towards you original setting again and listen as the music becomes focused again. Somewhere near the number we calculated above you will find the "sweet spot" where the vocals and bass are centered in the car and solid. Then fade the rear speakers back in a little bit at a time until the sound is full and pleasing but not at the expense of the solid centered imaging. And that's it. Now you can play around with the EQ and other audio adjustments. Try the above and if you have never hear a time aligned system you might be surprised by what you hear....it's a different experience than you are used to.... Let me know if you have questions....I've been running time alignment in all of my personal cars for....a long time now... NOTE: the L7 system with the MOST adapter can only accept 2 channels of input from the head unit so you will not use any delay settings on the rear speakers, just measure the front settings and use those to set the time alignment, its not perfect but is still much better than non time alignment at all! BOOT LOGO Due to popular demand....here are some boot logo screens you guys can use.... To put a custom boot screen on your dynavin just copy and paste any 800X480 to a SD card or USB, jpg, png, bmp, all seem to work. Put the SD or USB in the Dynavin, select the appropriate source on the dynavin and find the pic you want to use, when you are viewing it simply press the icon in the lower left and and a check mark will appear. DONE! I made this one, use it as you like....  I dont know where this one came from....but credit to whoever made it....  Credit to Transport3r for this one...nice! Credit to 1QuikWS6 for submitting these:         __________________ 评论 Time of installation is around 3 hours, that's what it took me to remove the old unit, do all the bits and pieces, run wire to the battery(i highly recommend to do this), install new unit, and mic installation!  Routing the wire to the battery! All hidden, i ran it over the glovebox and then down to side of the car under the plastics covers.  Here is the iphone cable that i ran under the center console trim to the console bin.  Connection to the battery with a inline fuse holder ato with a 15amp fuse, same amperage as the unit.  The main menu, due to the flash you can't really see it, damn iphone lol i didn't relocated the seat heating buttons into the button relocator because i didn't want to waste time tonight, so I'll do that when i come home from the long weekend. Also the unit buttons lights are exactly the same color as the oem, they look different because of the angle and the iphone camera flash.  Navigation system running, fast and smooth like the unit itself, faster than my TomTom VIA 1505M  评论 赞一个,大工程啊,肯定不便宜 评论 收藏先。。。 评论 没有你想像的贵吧:) 评论 求PM安装这个的价钱 评论 DYNAVIN这个牌子走的是亲民路线,价格还真的是不贵。 不过很多功能需要额外购买配件,在NZ的渠道难找不说,能找到的价格就高很多了。 不过对于DYNAVIN对于不同品牌不同车款的安装吻合度还是应该赞许的。 很多款都是完全吻合的,有些车款只是需要做小的调整就可以装上,从外表都很难看出这是aftermarket的产品。 评论 这里配件都能买到啊 评论 自己家里装?还是有实体WORKSHOP啊? 评论 想在E90转这个导航一体机,能pm一下联系方式吗? 出闲置 鞋子包包 基本都没用过几次新西兰出闲置鞋子包包,基本都是99成新,便宜出 3天前 上传 下载附件 (382.21 KB) 3天前 上传 下载附件 (492.58 KB) 3天前 上传 下载附件 (412.96 KB) 3天前 上传 下载附件 (376.45 KB) 3天前 上传 下载附件 ... 状况优良,很新的 ps4 / playstation 4 Slim 轻薄款新西兰卖轻薄款 便携带的 ps4 / playstation 4 Slim 1TB (1000GB) console 大内存游戏主机 ,附带controller (去年70刀新买的),附送1款可1到4人一块玩的ps4游戏,朋友家附近东区 Howick Botany 取。 发手机短信 ... 闲置家具新西兰搬家出售一些家具,有电视+电视柜,按摩椅,冰箱,电暖器,书柜,五斗柜,咖啡机,走步机,自动炒菜机,内衣洗衣机,泡脚机,烧烤机(全新)。有需要的 W lovekaren002, 有更多图片 ... Nike Dunk Low SE (GS) Grey/Green US4Y 鞋新西兰奥克兰 Nike Outlet 店内部的特价鞋。一共两双,相同尺寸,每双$70。 3天前 上传 下载附件 (45.95 KB) 3天前 上传 下载附件 (41.69 KB) 3天前 上传 下载附件 (47.47 KB) 3天前 上传 下载附件 (52.5 K ... 转让品牌BBQ烧烤炉新西兰诚意转让八成新Jumbuck 品牌BBQ烧烤炉,干净清洁,可小议,可短信,东区自取。 前天10:52 上传 下载附件 (768.91 KB) 前天10:51 上传 下载附件 (532.74 KB) ... Bugaboo Bee5 推车,大号室内儿童帐篷,辅食机新西兰东区Botany自取 微信mmhuhu Bugaboo Bee5 推车冬夏两套顶棚,冬季挡风(灰色),夏季(粉红)透气防晒带天窗 车况完美,没有毛病,购于德国原价1500+,现658出 大号游戏帐篷,55刀 辅食机, ... 洗碗机和空调机新西兰八成新, 外表无任何碰撞划伤 前天11:43 上传 下载附件 (466.52 KB) 前天11:43 上传 下载附件 (381.04 KB) 前天11:43 上传 下载附件 (454.78 KB) 前天11:43 上传 下载附件 (420.5 KB) 前天11:43 上传 下载附件 ... 低价出辣妈咖啡机 Linea Mini White &La Marzocco Lu新西兰2021 年 10 月购买,8 成新。辣妈咖啡机 Linea Mini White 磨豆机 La Marzocco Lux D by Mazzer功能正常。请短信 02108578884 2025-1-29 12:12:03 上传 下载附件 (418.5 KB) 2025-1-29 12:12:03 上传 下载附件 (455.98 KB ... 二手沙发,东区自取新西兰二手沙发套可以拆洗 前天12:41 上传 下载附件 (431.63 KB) 前天12:41 上传 下载附件 (396.71 KB) ... 东区出闲置新西兰QueenSize 双人床垫 - 20刀 偏弹簧,买来基本没太用,一直有topper保护,没有任何污点。乐谱架 - 5刀 儿童滑板车 - 5刀 稍微有点锈 豆子沙发 - 5刀 买来基本也是没太用 warehouse购入的乒乓球 ... 冰箱,queen size实木床,床头柜,五斗橱新西兰7天前 上传 下载附件 (282.3 KB) Queen Size 实木床架超硬床垫 $400(已售),实木五斗柜$200 7天前 上传 下载附件 (333.43 KB) Queen Size 实木床架棕榈床垫 $280 7天前 上传 下载附件 (552.91 KB) 床头柜 ... Dell Optiplex 7060 小電腦新西兰Dell optiplex 7060CPU: i5-8400TRAM: 8GBDisk: 256GBWindows 11 pro installedPickup from Glenfield or Auckland CBD 评论 push~~~~~~~~~~~~~~~~~~~~~~~~~~~~~~~~~~~~~~~~~ 评论 push~~~~~~~~~~~~~~~~~~~~~~~~~~~~~~~~~~~~~~~~~ 评论 push~~~~~~~~~~~~ ... AOC 24寸 超薄办公显示器 90刀新西兰型号:I2481FXH 24寸 60HZ 参数如图所示成色非常新,背面贴膜还在 功能、外表和显示一切正常,两个HDMI口 升级设备闲置 配件包含:1、显示器 2、原装电源线 奥克兰西区交易 短信:0211 ... 镀锌铁管直径70MM长度近2200MM新西兰这是家里拆除的天线支架杆,用途广泛,二手,自提,不送货 2025-1-27 13:55:43 上传 下载附件 (551.9 KB) 2025-1-27 13:55:42 上传 下载附件 (793.85 KB) 2025-1-27 13:55:41 上传 下载附件 (654.09 KB) 评论 ... Garmin Fenix 5 佳明GPS运动手表新西兰Garmin Fenix 5 多功能腕式光学心率户外运动手 2019年购于JB Hifi,功能正常,屏幕一直贴保护膜。 现在闲置,$300,北岸自取。 请短信 〇21 O8l5 lO33 前天19:02 上传 下载附件 (145.71 KB) 前天19 ... 便宜出森海塞尔ie200 hifi耳机,耐克Nike GT CUT2篮球新西兰森海塞尔ie200买了3个多月,裸机+耳机包。80刀。这个国内全新700多 这边156刀。带收据,成色非常好。 耐克 nike gt cut 2篮球鞋,euro11 中国码45,全新没穿过,带收据。这款鞋非常好。鞋子 ... iPhone 14 ProMax 256GB 电池健康87%新西兰2025-2-1 17:50:43 上传 下载附件 (242.69 KB) 2025-2-1 17:49:00 上传 下载附件 (134.08 KB) 2025-2-1 17:49:28 上传 下载附件 (120.52 KB) 2025-2-1 17:49:13 上传 下载附件 (111.7 KB) 2025-2-1 17:46:40 上传 下载附件 (13 ... 奶粉厂装原料的空桶!新西兰奶粉厂装原料的纸皮桶,绝对干净!1刀一个,多买有优惠! 2025-1-31 08:19:34 上传 下载附件 (312.99 KB) 2025-1-31 08:19:32 上传 下载附件 (277.61 KB) 2025-1-31 08:19:32 上传 下载附件 (306.44 KB) 评论 k ... 出售Queen Size床架、床垫和两个床头柜新西兰出售 Queen Size床架、Ecosa床垫 和 两个床头柜 ,整套出售。所有物品均 状态良好 ,保养得当,来自 无烟家庭 。 详细信息: 床架: 结实稳固的木质床架,黑色人造皮革软包床头,现代 ... 全新MG HS来啦,上汽荣威RX5焕新版新西兰新车36990到42990售价,更大更好开更省油,还有10年保修 这个外观怎么样? 评论 新西兰的价格我比较关心 评论 先看看小红书 有没有什么自燃的消息被上汽给压了下去 评论 怎么又来黑 ... |